Table of Contents
Using Apache2 as Proxy
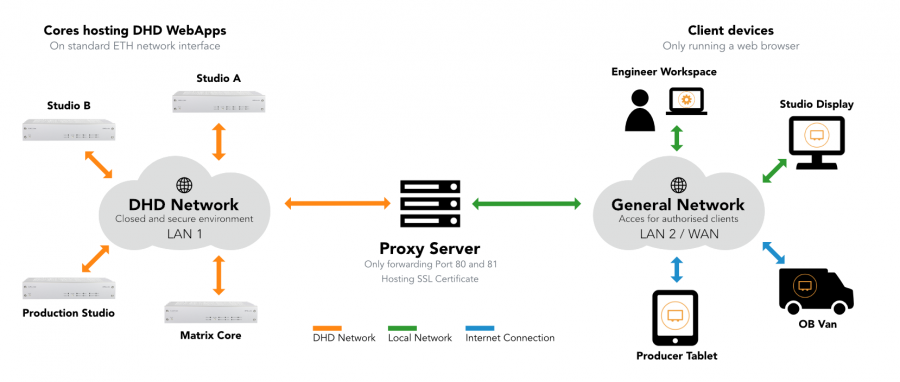
This document shows a sample configuration process to use reverse proxy as a method to make DHD Web Apps available on a public network.
Important
The content of this document is for information only. The information presented in this document does not form part of any quotation or contract, is believed to be accurate and reliable and may be changed without notice. No liability will be accepted by the publisher for any consequence of its use.
Required apache2 modules
Modules required by apache2 are:
- proxy
- proxy_html
- proxy_http
- proxy_wstunnel
- rewrite
Linux
Install Apache2 via
sudo apt install apache2
Enable all required modules by using
sudo a2enmod [MODNAME]
Create new directory /etc/apache2/proxy
Add your new proxy file with all configuration data to the default (or designated) vhost (default: *80)
File path: /etc/apache2/sites-enabled/000-default.conf
Add line:
Include /etc/apache2/proxy/*.conf
before </VirtualHost>
For more advanced hosting, use the code snipped provided below for windows. Make sure to adjust paths.
Windows
Windows apache2 distribution used here was XAMPP.
Enable all required modules by uncommenting them in httpd.conf located in C:/XAMPP/apache/conf/.
Create new directory C:/XAMPP/apache/conf/proxy/.
Add a new virtual host in C:/XAMPP/apache/conf/extra/httpd-vhosts.conf. Code:
<VirtualHost *:80>
  ServerAdmin webmaster@localhost
  DocumentRoot "C:/xampp/htdocs/"
  Include "C:/xampp/apache/conf/proxy/*.conf"
  <Directory "C:/xampp/htdocs">
    Options Indexes FollowSymLinks Includes ExecCGI
    AllowOverride All
    Require all granted
  </Directory>
</VirtualHost>
In this snippet port 80 is bound to apache, the vhost gets a document root and also includes the newly generated proxy folder. Also, hosting in document root is enabled.
Then, add the proxy1.conf as described below.
Sample Configuration (per device or unique target, Linux & Windows)
Create file proxy1.conf at /etc/apache2/proxy
The following is an example code for a device:
<Location /demo1/>
  ProxyPass http://10.5.33.104:81/
  ProxyPassReverse http://10.5.33.104:81/
  RewriteEngine On
  RewriteCond %{HTTP:Connection} Upgrade [NC]
  RewriteCond %{HTTP:Upgrade} websocket [NC]
  RewriteRule /(.*) ws://10.5.33.104:81/xxx [P,L]
  Require all granted
</Location>
Exchange the three IPs provided here with the designated device IP. (Only IP, not port or paths).
/demo1/ in the Location tag is just a sample path and can be replaced. The / in the end must be set and entered with any call in chrome.
Rewrite rules are neccessary to allow connection upgrade request pass the proxy.
To apply changes, save the conf file and on unix systens, use
sudo service apache2 restart
On windows, restart the apache2 service.
Using Authentication
User Auth requires the following additional module:
- auth_basic
Enable it using
sudo a2enmod auth_basic
Create a .htpasswd file in /etc/apache2/proxy/ directory
To create a .htpasswd file, install:
sudo apt install apache2 apache2-utils
then create it using:
sudo htpasswd -c /etc/apache2/proxy/.htpasswd username
You will be prompted for the new users password. To add another user to the file run the command again, but without -c argument.
Then modify your proxy1.conf file to add authentication:
  ProxyPass http://10.5.33.104:81/
  ProxyPassReverse http://10.5.33.104:81/
  RewriteEngine On
  RewriteCond %{HTTP:Connection} Upgrade [NC]
  RewriteCond %{HTTP:Upgrade} websocket [NC]
  RewriteRule /(.*) ws://10.5.33.104:81/xxx [P,L]
  Require valid-user
  AuthType Basic
  AuthName "Enter Password"
  AuthUserFile /etc/apache2/proxy/.htpasswd
Note
Don't use a relative path to .htpasswd file.
To apply changes, save the conf file and use
sudo service apache2 restart
Using SSL Encryption
For XAMPP / Windows, see: https://commaster.net/content/how-setup-lets-encrypt-apache-windows
Because of the rewrite rule in the vhosts (see link above) no “https” rules have to be added in proxy1.conf.
