Device Menu
The Device menu offers variable functions to maintain your DHD devices.

Reconnect
The Reconnect command interrupts the TCP/IP connection between the computer and the selected device and opens it again. This way, the current settings of the device are read out automatically.
Tip
For certain functions, transferring the commands can take quite a while, longer than the Refresh process of the Maintenance Window. In this case, the old values are shown although the new one are available to the hardware already. Use the Reconnect function to check the settings if in doubt.
Network Config
With this command, you open the Network Config window of DHDCS. In this window you can change the IP settings of the selected DHD device in DHDCS devices list.
There are two ways to change the IP configuration of a DHD device:
(a) The requested device is available in the DHDCS devices list
(b) The requested device is NOT available in the DHDCS devices list
Requested device is available in the List (a)
- Right-click on the device name in the list.
- In the contextual menu, select
Network Config - The
Network Configwindow opens and shows the IP configuration of the device.
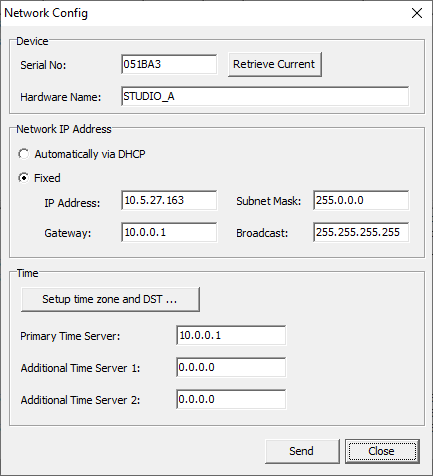
In the Network Config window, you can change the current IP configuration of a certain device.
Serial No
The selected device, is always represented by its Serial No. This serial number is unambiguous and valid for only one DHD device. The field is used to read out settings of devices that are located in a different network segment. Find more details on this in the following section “Requested device is NOT available in the list (b)”.
Hardware Name
Every DHD system can be assigned a Hardware Name for better identification of the system. This name helps to identify the device in the network. You can choose any name, it can be up to 30 digits long but may not contain spaces. Special characters that are not allowed, can not be entered. In DHDCS only the first 10 digits of the hardware name are shown.
Automatically via DHCP
If a DHCP server is located in the network that manages the IP configuration of the selected device, select the option Automatically via DHCP.
Fixed - Fixed IP setting
If you have no access to a DHCP server or want to adjust the IP configuration manually, first select Fixed and then enter the appropriate values (IP-address, Subnet Mask, Gateway, Broadcast) into the appropriate boxes.
Tip
As factory default DHD devices will be delivered with IP basic settings based on their MAC address. See IP basic settings for more information.
Important
In case of question concerning the parameter settings, ask your IT department or your system administrator.
Time Server
DHD systems have an internal system time that can be synchronised using a NTP Time Server. To do this, enter the IP address of your NTP Time Server in the Time Server box.
Depending on your chosen time server you may need to enter some further settings. Click Setup time zone and DST to be able to enter a general time zone offset and if necessary the settings for the daylight saving time.
Tip
A standard Windows PC can be used as NTP time server, see Configure Windows as a NTP time server
With 52/XC2/XD2/XS2 cores you also can define two additional Time Servers. If the primary time server is not reachable, the core will use Additional Time Server 1. If Additional Time Server 1 is not reachable, the core will use Additional Time Server 2.
Requested device is NOT available in the List (b)
You need to add the device manually to your list by using Logging > Add device.
After adding the device manually to the DHDCS it might be possible, that the Network Config window opens with all boxes empty. Click Retrieve Current.
Important
If Network Config window is empty:
- Check DHDCS settings of network interface and broadcast address
- Check firewall settings
- Check your network: are UDP broadcasts allowed?
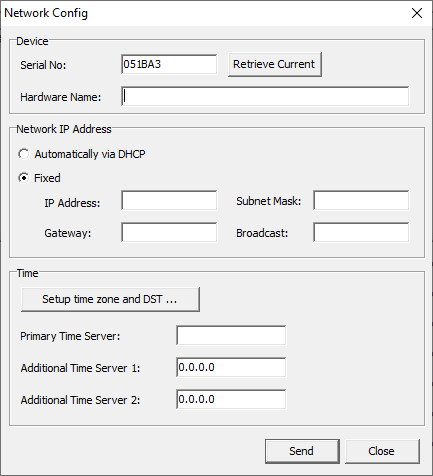
This way the device will transfer the current IP settings. These are then shown in the Network Config window and can be changed there.
Changing the data is carried out exactly as described in Requested device is available in the List (a). Changed data are finally transferred to the device by clicking Send.
Nevertheless, if the device is not reacting, communication could be blocked by certain IP settings. In this case it is recommended to adjust the IP settings of the computer to the ones of the device. To do this, temporarily change the IP address of the computer to the one valid for the device. (see IP Basic Settings & Configuration)
There is no communication possible with the device
If, despite all efforts, the device is not reacting although there is a physical connection to your network, the communication might be blocked due to the current security settings in the network. In this case, check which measures for a higher network security may be dropped (e.g., firewalls, router, managed switches, …).
For solving the connection problems, contact the responsible IT department and check which of the measures described in the network specification have to be done to establish a communication between PC and DHD system.
Enter License
See Licensing Pages for more Information.
Using this command, you can enter the license codes. There are license codes for the firmware, for software operation and for feature upgrades, like the Enhanced DSP Processing license.

To send a license or voucher code to the DHD device, enter it in the License or Voucher Code text box and click Apply to Device button.
If the License code entered was valid, Store License: Ok message appears. If the License code entered was invalid, Store License: failed, License Invalid error message appears.
Tip
You can find out all licesnses of your device on the system page of Web Apps (firmware version 9.1 or higher):
- Double click the device entry in the DHDCS device list. Your computers browser opens.
- Click the system icon
 in Web Apps.
 - On the
Firmware>License Informationpage, all licenses are listed.
Show Protocol Window
Show Protocol Window opens the protocol window. In this window, you can track all sent UDP and TCP/IP messages in the network. Select the Enable Protocol check box to start the recording of the protocol.
If you want to see the messages of the device selected in the list only, select the Filter foreign UDP blocks check box. Click Clear Window to delete all messages in the protocol window. The log file is not affected by this.
In the boxes TCP Block and UDP Block you can enter a TCP/IP or UDP command directly and transfer it into the network, by clicking Send.
All sent commands are saved and available in drop-down menus at the boxes TCP Block and UDP Block to be sent again. If you want to delete all saved commands, click Clear History.
Important
Use this function only if advised by your DHD distributor or DHD.
System Status
Save To File
In the Device menu, select System Status > Save to File to save the currently read out status of the device. A file named System_Status_<Project ID>_<Hardware Name>_<Date>_<Time>.tgz is created.
If you want to read out the saved content, you first have to unzip it using a ZIP-decompressor. The result is a file with the same name but the extension .tar. Now, open this file using a RAR-decompressor. Finally, some files with the extension .xml emerge as well as some files necessary to show the XML files. You can view the XML files in a browser (e.g., the Microsoft Internet Explorer). For this, open index.xml. The view is the same as if you had selected the device in the device list. Then, you can view the other pages like in the Maintenance software.
Tip
This system state is often requested by DHD support.
Send By Mail
This function creates in a first step the same zipped file like the command Save to File.
Then, you instantly can send this file per e-mail to DHD support. For this, it is necessary to have an E-Mail Client installed on the PC and to set up an user account. In this case, a new mail window is opened automatically and the files created are attached. Only click Send and the e-mail is transferred to the DHD support team.
Download
If you created a system status - file using Save To File or Send By Mail and don't want (or don't need) to create a new file, you can download the already created file here.
Note
It is always recommended to create a fresh system status using Save To File or Send By Mail when contacting DHD support. This function is for debugging purposes only.
Restore Snapshots
With this function it is possible to transfer one or more mixer and channel snapshots from the PC to the console. (Use the function Save to File to save all mixer and channel snapshots of a device)
Note
A firmware reset is required if mixer or channel snapshot names are also being restored.
Otherwise the restored snapshot names will not be shown in snapshot menus.
Important
Snapshots created with firmware version 9.0 or below are not compatible with firmware version 9.1 or higher and vice versa.
Alternatively you can use Snapshots App to manage your Snapshots.
Mixer 1 to 4
In Toolbox software you can create several virtual mixers for a DHD core device. Select the mixer that you want to handle. If you did not create virtual mixers, operate in Mixer 1.
Save Snapshot 0
This command copies the current parameters of a DHD core device to the Mixer Snapshot 0 storage on the Micro SD-Card. This way, the settings are kept also after switching off the device and can be used as default setup after a reset. Snapshot 0 can also be loaded via the console like all other snapshots.
Note
Snapshot 0 defaults can only be saved using this command or using Snapshots App. There is no option to do this at the console!
First you have to select the desired device to trigger the command. After that, a security confirmation message Save current Parameter settings as default? is shown. After confirming with Yes the settings are copied.
Important
It is vital to choose the command Save Snapshot 0 after every setting into operation of a new DHD device.
Clear Parameter Memory
This function sets all DSP parameters of all channels to their respective default values.
Important
Resetting the parameters influences the audio processing of all channels. Make sure that it does not adversely affect important signals.
Firmware Reset
Select Firmware Reset to restart the firmware of the selected device.
Warning
A firmware reset temporarily interrupts the audio processing of the system. Only perform a firmware reset if you are sure that it does not influence important signals.
Note
For more informations on the differences between Firmware Reset and System Reboot, visit reset behaviour page.
System Reboot
Select System Reboot to restart the boot loader of the selected device.
Warning
A system reboot temporarily interrupts the audio processing of the system. Only perform a system reboot if you are sure that it does not influence important signals.
Note
For more informations on the differences between Firmware Reset and System Reboot, visit reset behaviour page.
Factory Test
This function can be used to check every single element of the fader and control modules of a mixing console.
Before a device is shipped, the functionality of all elements is tested by DHD. If you think that your console could have a hardware problem (e.g., a key is not working), you can clarify this with the aid of this function.
Before you use this option, you should transfer an empty configuration to the device. This makes the results more clear, because there will be no overlapping with the configured functions. Therefore, add a new device to your Toolbox project and transfer this empty configuration into the device.
Testable with this function are faders, keys, encoders, potentiometers, OLED displays, brightness sensors, TFT displays and LEDs.