User Management
Administrators are able to create several users with different priorities. Settings from users with a higher priority are valued as more important then settings from users with lower priority. The users, created in TB8, are imported automatically.
Normally, a technician should have more rights than a DJ, because a DJ is mostly not technically trained enough. On the other hand, of course, a DJ should be able to control the functions he needs to set.
In the toolbar, click  to open the
 User Accounts window. The user accounts are shown and you can edit them and add new users. Alternatively, you can open this window from the Administration menu.
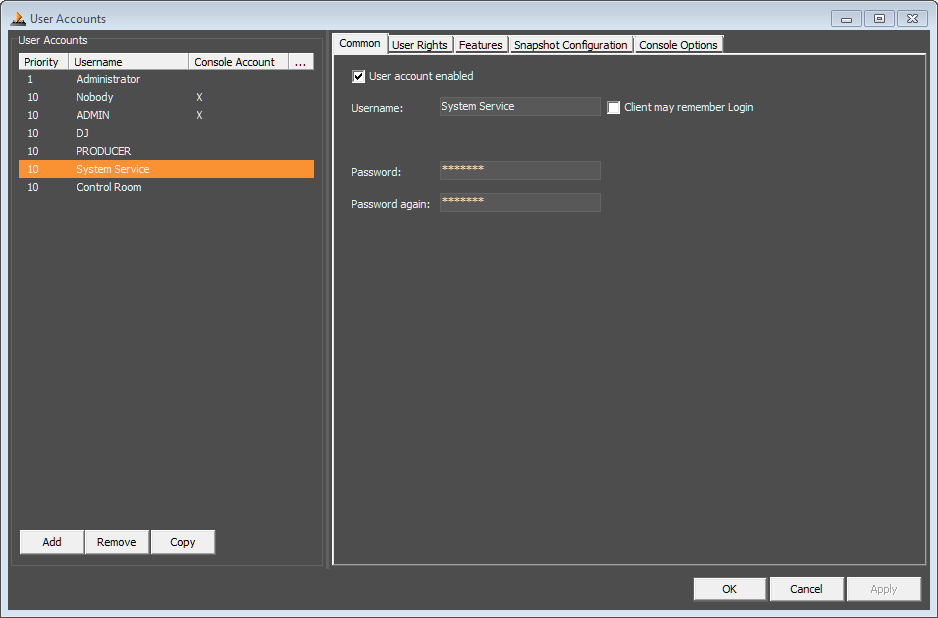
In the User Accounts list, click Add to create a new user. Click Remove to delete the selected user from the list. Click Copy to duplicate users and their settings. Imported TB8 users can not be copied.
Common
In the User Accounts area, select a user. On the Common tab, type a login name for the user in the Username box. Type a password for the user in the Password box and enter it again in the Password again box. You have to assign a new password to a copied user because the password is not taken over. It is necessary to enter a 4-digit PIN only containing numbers for all users that should be able to log in at the console. The account can be activated and deactivated by the User account enabled check box.
Note
The account of the super administrator can not be removed! It is also not possible to deactivate the account or to change the priority. Login name and password can be changed.
Also, the Nobody account can not be removed and only a few settings are possible to adapt. Please find more information about this account in the Features section.
Important
All the passwords must differ from each other because the system only compares the passwords and PINs respectively and not the usernames.
Furthermore, an imported user is not the TB8 user itself, it is a copy of this user. That means the TB8 user and the Operation Manager user are two different users with the same name and PIN. Conversely, changing the name and/or the PIN of an imported user does not influence the user created by the TB8.
User Rights
On the User Rights tab, select the Administrator check box, to assign global administrative rights to a user or define the importance of the user by selecting the User Priority (1 = high priority, 10 = low priority).
The Authorisation area shows the relationship between the currently selected user and the authorization groups. These relations can not be changed for imported TB8 users.
Authorisation Group Rights
Users are allowed to work with every mixer if no user groups and users are defined in the TB8 configuration or if they are not assigned to a group. As soon as you assign a user to one or more groups, he is only able to work with the virtual mixers he is allowed to use.
Mark the desired user in the User Accounts list. With the checkboxes of the authorization graph, the user can be assigned to one or more user groups. In the example above, the user DJ 3 is able to work with the virtual mixer Mixer 1 with the rights of the user group DJ. But if the same user logs on to Mixer 2, he is allowed to work with the rights of the Producer authorization group.
The authorisation groups need to be created with the TB8 configuration software. Besides the authorization groups, the created users and their properties are imported by the DHD Operation Server, too. The assignment of imported users to authorisation groups can not be changed in the DHDOM.
Please read the Toolbox8 Manual if you need more information on creating users and authorization groups.
Features
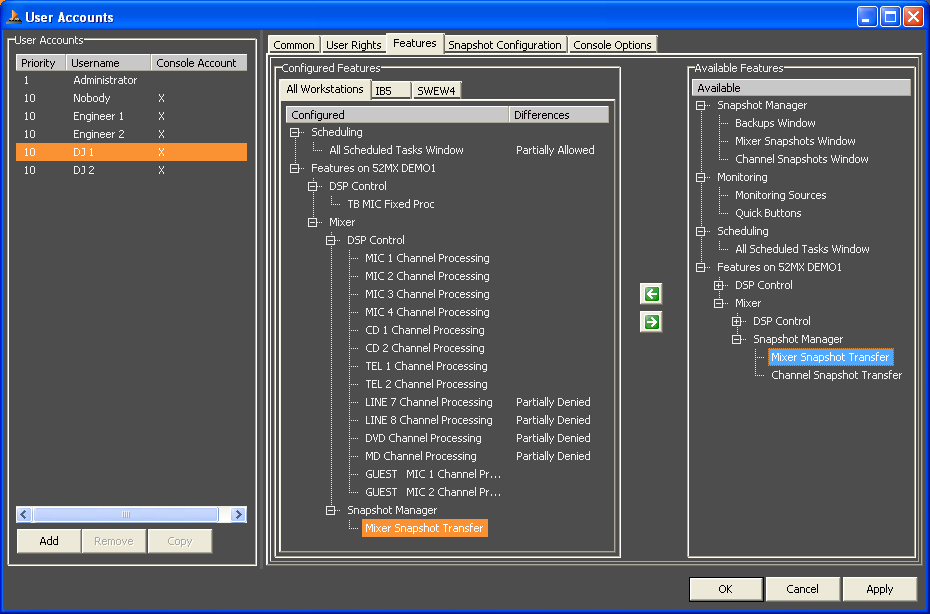
For every user can be defined, which applications and features of the DHDOM he is allowed to use depending on the workstation he is logged on. Basically, you can assign the desired rights to all workstations and afterward it is possible to allow or deny special options for the use in conjunction with certain PCs. Or you configure each workstation individually.
Follow these steps to enable the available features for users:
- In the
User Accountslist, select one or several users. - Select a workstation tab or the
All Workstationstab in theConfigured Featuresarea. - The
Available Featuresarea shows all features which you can enable for a user. Drag the desired features from theAvailable Featureslist to theConfigured Featureslist to allow the user to use this Feature. Drag a feature from theConfigured Featureslist to theAvailable Featureslist, to deny access to a feature. Alternatively, you can use or make these assignments.
If you enable a feature to all workstations and remove this feature for single workstations afterward, on the All Workstations tab this feature is marked in the Differences column with the term Partially Denied. Vice versa, features that were assigned to single workstations only are marked with Partially Allowed.
The Available Features in detail:
Snapshot Manager: EnablesBackups,Mixer SnapshotsandChannel Snapshotstabs. Please note, that it is necessary to allow mixer and channel snapshot transfers between each virtual mixer and the DHD Operation Server. Because of that, you can find theSnapshot Managerentry again for each virtual mixer in the list.Monitoring: Enables theMonitoring Sourcestab and theQuick Buttons.Scheduling: Enables theAll Scheduled Taskstab.Remote Control: All available Remote Control Views are listed and can be enabled.Features on <device>: This subsection includes all settings that are related to a device. If there are several devices in the project, separate entries for each device are shown.DSP Control: All available Fixed Processings of the device are listed and can be enabled.Routing: All configured Matrices of the device are listed and can be enabled for routing.Scheduling: All configured Matrices of the device are listed and can be enabled for scheduling.Mixer: This branch includes all settings that are related to a virtual mixer. If a device contains several virtual mixers, separate entries for each virtual mixer are shown.DSP Control: All available Fader Channel Processings of the virtual mixer are listed and can be enabled.Snapshot Manager: Enables the Mixer and Channel Snapshot Transfer rights to allow snapshot transfers between the respective virtual mixer and the DHD Operation Server.
In the User Accounts list, you can find a special user account called Nobody. This account represents the situation that no user is logged in at the console and is only intended to make it possible to exchange snapshots between the device and the server PC without a user login. If the Nobody account is selected, only the Features tab is provided. Instead of the release of features to the available workstations, in this case, the features can be assigned to the console.
Snapshot Configuration
On this tab, you can assign default snapshots on login for a workstation. When a user logs into DHDOM, the mixer will recall the defined (Server-) Mixer-Snapshot.
Important
Make sure, you assigned Device and Mixer to your workstation. See Workstation Configuration for more information.
Note
Snapshot Management-License is required.
Console Options
If you select the Allow Console Login check box, the user is able to log in at the console. You need to re-enter the password because in this case, the password must be a 4-digit PIN. Because the password is protected, it is not possible for the software to check the existing password, even if this is already a 4-digit PIN.
By using the Console Autolock function, you can determine if a user needs to log in again after a certain time. Select a predefined time duration from the Console Autolock list (2, 5, 10, 15, 20 or 30 minutes) or select Off to disable this function. Select the Display Name on Console check box to show the name of the logged in user in all displays of the control modules.
Note
For imported TB8 users, the settings of the Console Options tab are adapted from the TB8 project and the function Allow Console Login is enabled. These settings can not be changed for imported users.
Click Apply to save your settings if you want to continue with the user configuration or click OK to save and close the User Accounts window. It is possible to undo all settings and reload the state you had saved last by clicking Cancel.