IP Basic Settings & Configuration
IP Basic Settings
Before delivery, each Series 52 system is configured with an IP basic setting. This setting has a certain pattern, unless the customer indicates different requirements in his order.
Each controller with an integrated Ethernet interface has a dedicated network address, the so-called MAC address (MAC - Media Access Control). This address is always unambiguous and unique. DHD owns the MAC address range 00:0A:63:00:00:00 to 00:0A:63:FF:FF:FF, therefore this address is also referred as serial number of a DHD device.
A network-compatible controller module is always identified in a network by its MAC address. As the first 3 Bytes of all DHD MAC addresses always are identical, only the last 3 Bytes are indicated in DHD software applications.
Note
If you find the term “MAC address” in the context of a DHD system, it always refers to the last three Bytes of the actual address, although this is, strictly speaking, incorrect.
Important
These last 3 Bytes of the MAC address are used for generating the IP address for the basic setting.
Find below an example for the MAC address 10:00:02
- Every single Byte is translated into the decimal format:
10h = 16, 00h = 0, 02h = 2 - Afterwards the decimal numbers are strung together; 10 is prepended, and all numbers are separated by periods:
10.16.0.2
The subnet mask is automatically set to 255.0.0.0, according to the classification of this IP range.
Thus the following IP basic setting results for the example device:
IP address: 10.16.0.2Subnet mask: 255.0.0.0
IP Configuration
Tip
See also Maintenance Documentation.
The IP settings of a Series 52 system are defined directly in the systems communication controller. To set IP parameters, use the Maintenance Window, an application, which is implemented in Toolbox5, Toolbox8, SXConfig and DXConfig.
You can open the Maintenance Window by clicking the according command in the View menu or by pressing F7 on your keyboard.

In the Device menu, select Network Config….
With this command, you open the Network Config window of the Maintenance software. In this window you can change the IP settings of the selected device.
After selecting a system by right-clicking on it in the device list in the Maintenance Window, a contextual menu opens that allows access to the IP settings using the command Network Config.

There are two ways to change the IP configuration of a DHD system:
(a) The requested device is available in the list on the left of the Maintenance Window.
(b) The requested device is NOT available in the list on the left of the Maintenance Window.
Requested device is available in the List (a)
- Right-click on the device name in the list.
- In the contextual menu, select
Network Config - The
Network Configwindow opens and shows the IP configuration of the device.
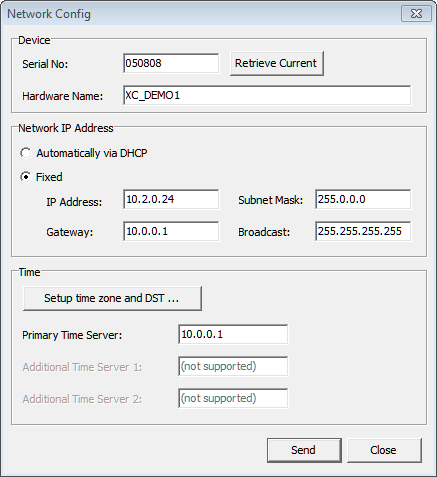
In the Network Config window, you can change the current IP configuration of a certain device.
Serial No
The device the network settings of which are shown, is always represented by its Serial No. This serial number is unambiguous and valid for only one controller. The field is used to read out settings of devices that are located in a different network segment. Find more details on this in the following section “Requested device is NOT available in the list (b)”.
Hardware Name
Every Series 52 system can be assigned a Hardware Name for better identification of the system. This name helps to identify the device in the network. You can choose any name, it can be up to 30 digits long but may not contain spaces. Special characters that are not allowed, can not be entered. In the Maintenance Window only the first 10 digits of the hardware name are shown.
Automatically via DHCP
If a DHCP server is located in the network that manages the IP configuration of the selected device, select the option Automatically via DHCP.
Fixed - Fixed IP setting
If you have no access to a DHCP server or want to adjust the IP configuration manually, first select Fixed and then enter the appropriate values (IP-address, Subnet Mask, Gateway, Broadcast) into the appropriate boxes.
Tip
As factory default DHD devices will be delivered with IP basic settings based on their MAC address. See IP basic settings for more information.
Important
In case of question concerning the parameter settings, ask your IT department or your system administrator.
Time Server
Series 52 systems have an internal system time that can be synchronised using a NTP Time Server. To do this, enter the IP address of your NTP Time Server in the Time Server box.
Depending on your chosen time server you may need to enter some further settings. Click Setup time zone and DST to be able to enter a general time zone offset and if necessary the settings for the daylight saving time.
Tip
A standard Windows PC can be used as a NTP time server, see Configure Windows as a NTP time server
With 52/XC2/XD2/XS2 cores you also can define two additional Time Servers. If the primary time server is not reachable, the core will use Additional Time Server 1. If Additional Time Server 1 is not reachable, the core will use Additional Time Server 2.
Requested device is NOT available in the List (b)
You need to add the device manually to your list by using the DHDCS - see Add device.
After adding the device manually to the DHDCS it might be possible, that the Network Config window opens with all boxes empty. Click Retrieve Current.
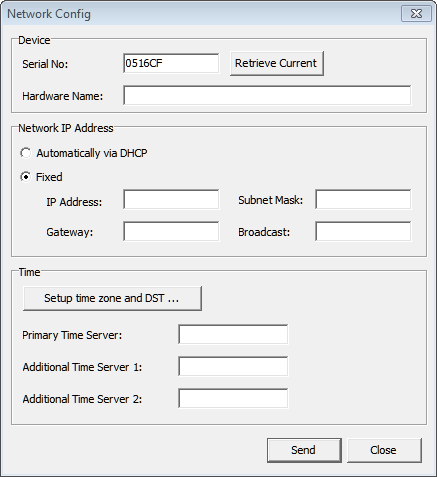
This way the device will transfer the current IP settings. These are then shown in the Network Config window and can be changed there.
Changing the data is carried out exactly as described in Requested device is available in the List (a). Changed data are finally transferred to the device by clicking Send.
Nevertheless, if the device is not reacting, communication could be blocked by certain IP settings. In this case it is recommended to adjust the IP settings of the PC to the ones of the device. To do this, temporarily change the IP address of the PC to the one valid for the device. (see IP basic PC settings)
There is no communication possible with the device
If, despite all efforts, the device is not reacting although there is a physical connection to your network, the communication might be blocked due to the current security settings in the network. In this case, check which measures for a higher network security may be dropped (e.g., firewalls, router, managed switches, …).
For solving the connection problems, contact the responsible IT department and check which of the measures described in the network specification have to be done to establish a communication between PC and DHD system.