Global Ressources
Overview
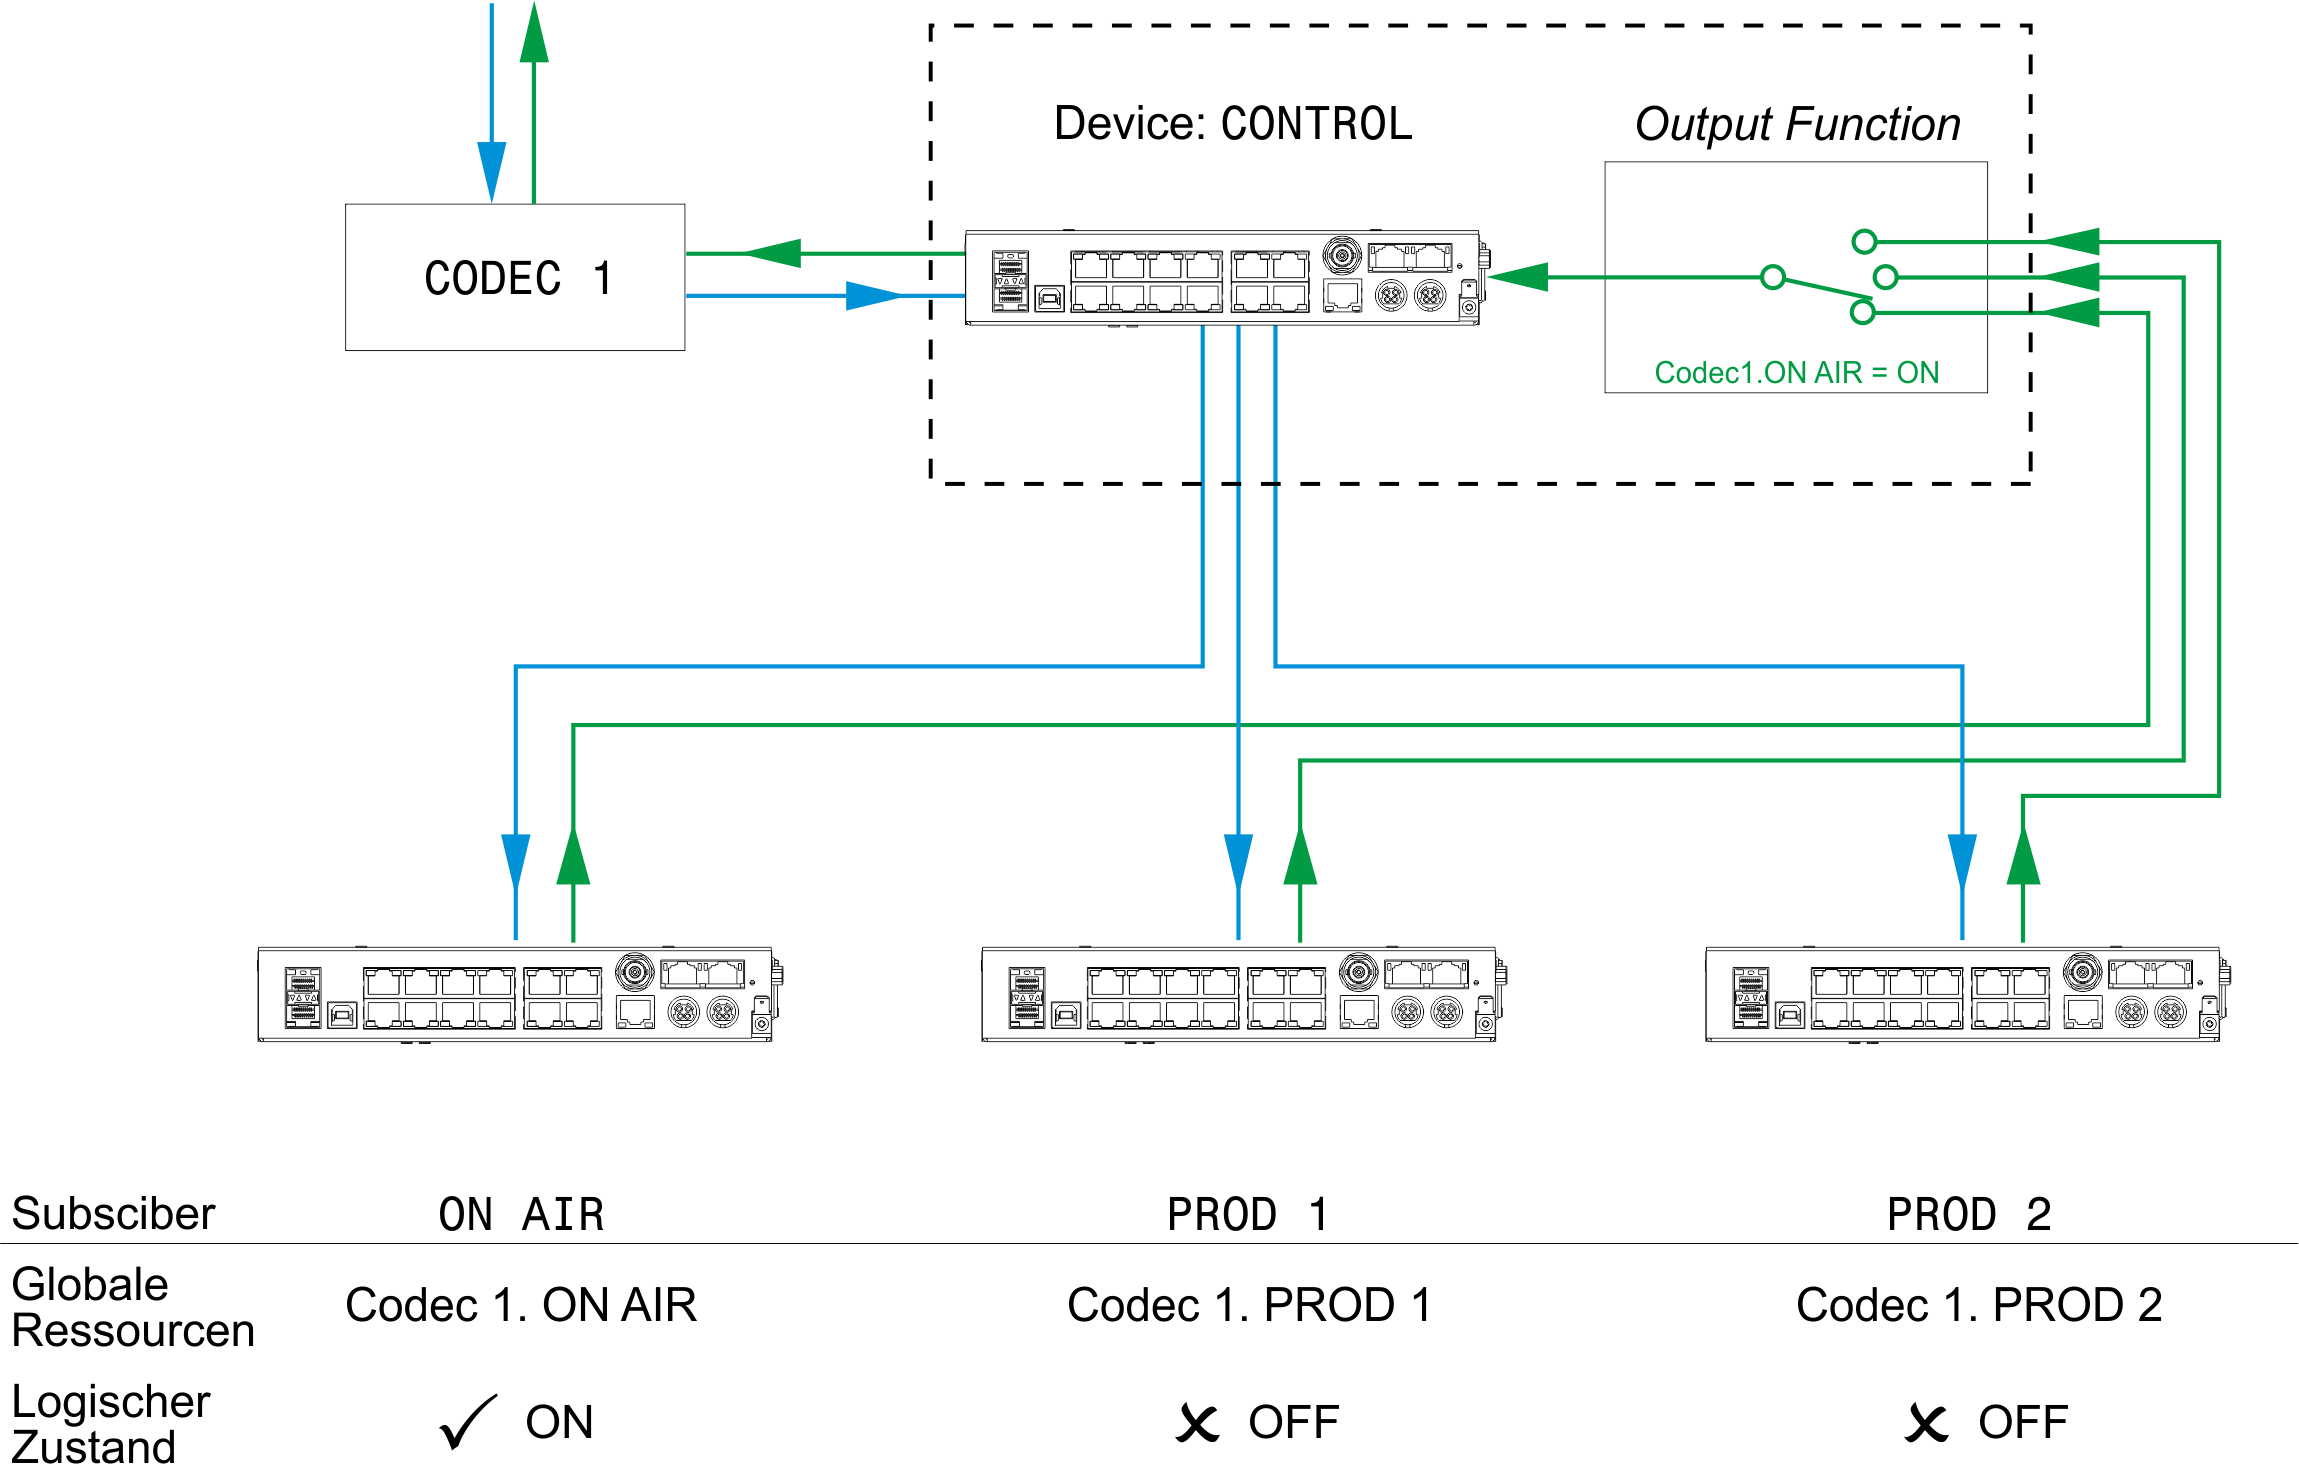
Global resources are in a way similar to global logics. They are intended to assign single audio sources in a studio complex with several DHD systems exclusively to certain users. Typical scenarios may be an on air switch or a central phone line, the return line of which can be fed selectively by two or more studios. But only one studio can own the line at a time. The following figure illustrates such a situation. Here, the CONTROL device is the master, in which the global resources are coordinated. All other devices are subscribers that access the resources alternating.
Global resources offer the functions which are necessary to enable the exclusive ownership of a resource and the change of the owner on request. The functions are based on the following design principles:
- A global resource is offered or published by exactly one master. One or more subscribers are defined and can own this resource. You can define up to 30 global resources. Up to Toolbox v9.0.15: 200 subscribers are possible. Minimum Toolbox v9.0.16: 250 subscribers are possible.
- A resource can either be idle (no subscriber) or owned by exactly one subscriber. You can define which condition a global resource can have after switching on or resetting a device. It can either be idle or assigned to a certain subscriber.
- Master and subscriber are different devices in the same project. But it is possible to define master and subscriber on the same device.
- The master is only defined to determine the device responsible for managing the global resource. It has no additional function.
- Global resources are implemented as special logic signals. For each subscriber of a logic source, there is exactly one global logic signal that can be accessed by all devices in the project. This logic signal is active if the corresponding subscriber owns the resource. At the same time, the logic signals of all other subscribers are inactive.
- Toggling between the different subscribers is done using special key functions. These have to be assigned to keys on the console, which will be explained in detail later on.
- Global resources only enable the toggling of logic signals. The audio signals themselves are controlled using output functions or super output functions, while the logic signals of the global resources are controlling these output functions.
You can define up to 30 global resources that all can be used by the same project. Therefore, the devices must be connected by Ethernet and able to exchange UDP messages.
Important
Make sure all devices have the same project ID! Otherwise, you are not able to exchange UDP messages and the global resources do not work.
Defining Global Resources
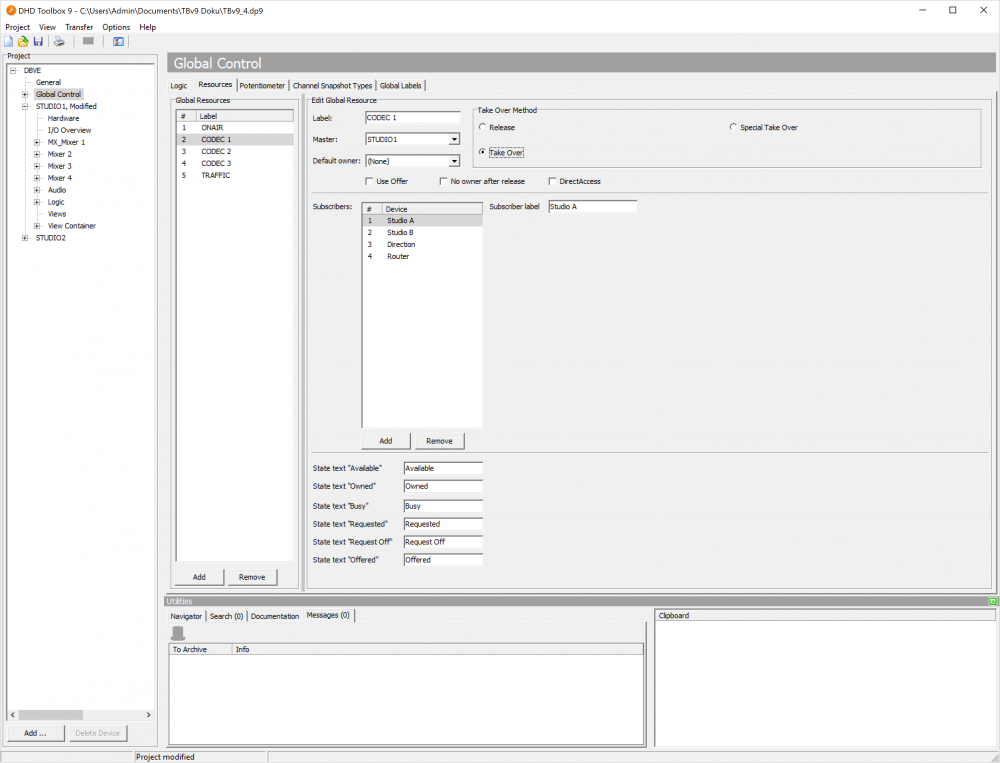
To define global resources, in the project tree select Global Control and click on the Resources tab.
Now follow these steps to define a global resource:
- In the
Global Resourcesarea, clickAdd, to set up a new resource. In theLabelbox, type a distinctive name. - In the
Masterlist, select the device that is to manage the global resource. It is not necessary to define a subscriber on the device as well - but you can if it makes sense.
Note
You can define any device as master. But we recommend to choose the device that the resource (e.g., the phone line) is really connected to. This way, you make sure the line is also available if the master device is active. - Now determine which devices have subscriber access to the global resource. Under the
Subscriberslist, clickAddto create a new subscriber. In theSubscriber labelbox, enter a distinctive name. - Set a default owner in the
Default Ownerlist. This is the subscriber that owns the global resource by default after switching on or reset the master device. The default subscriber is also assigned if a subscriber releases a global resource without being requested by another subscriber. It is possible to deactivate this function by selecting theNo owner after releasecheck box. If you select theUse offercheck box, the owner of the resource is able to provide the resource to the other subscribers. That means, the owner presses the resource key and OK once. Afterwards the resource key of all subscribers starts flashing. Now, one of the subscribers only needs to press the resource key and OK once to take over the resource. - The new global resource is instantly available as a logic function. It can be accessed by all devices in the project. It is shown in the
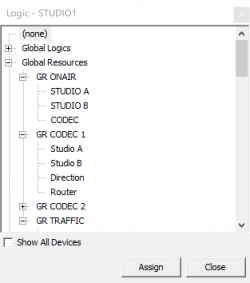
Logic Sourceswindow (F5key) under the nodeGlobal Resources. Its name follows the scheme<Name of the Global Resource>.<Name of the Subscriber>. There is exactly one logic function for each subscriber assigned. This is always active if the subscriber owns the global resource.
You can only access a global resource if the corresponding keys for requesting the resource are defined on the console.
Important
On each global resource you want to access, you have to define a special key in a control module or TFT view. In addition, in the same operating desk, keys with the system functions OK and Cancel must be defined.
To define a key for requesting a global resource, follow these steps:
Tip
If you are using a 52/XC or 52/XS core, it is necessary to select the Use control Network Option check box to have access to the Resource Request key function.
- Select the key (Console or TFT Button) you want to use to request the global resource. The
Key Functionswindow opens. - Drag the
Resource Requestfunction from theKey Functionswindow to the desired key. Two drop-down menus appear below theLabeltext box. - In the
Resourcemenu, select the global resource which is requested by the key. - In the
Reserve formenu, select the device for which subscriber the global resource is requested.Tip
It makes sense to request global resources for another subscriber, if the corresponding key is located in the control room, from which lines or phone codecs are assigned to different studios. If you use routing panels with LCD keys, assigning to different devices is also useful. - Assign the key colors you prefer. The color
Availableis shown if the resource is available. The colorOwnedis shown if the devices owns the global resource. The colorBusyis shown, if the global resource is taken by another subscriber.
If a global resource is taken by a device, other authorised subscribers can request this global resource. To request a resource, to take it or to acknowledge or deny requests, in each device the system functions OK and Cancel have to be configured as key functions.
There are three procedures to take over a global resource:
Release: The resource is taken by a device; now this device is called the Owner. Another device requests the resource. The owner can deny this request or approve. In case of approval, the resource is released (Release). This procedure requires that the appropriate keys are to be pressed on the operating desks of both devices.Take Over: The resource is taken, if it is requested. The requester itself approves to the request and takes over the resource. Alternatively, the owner can release the resource or deny the request.Special Take Over: The resource is taken by the owner, if it is requested. If the request is not approved by the owner, the requester can force a take over. Therefore, the requester has to push the request key and the OK key at the same time for 5 seconds. Alternatively, the owner can also release the resource or deny the request.
A resource is always handed over in two steps: the request and the approval. The colors of the corresponding keys and the LED displays inform about the current status.
- The resource is requested (Request). Therefore, the
requestkey and theOKkey have to be pressed at the same time on the console of the requester. - In the second step, the resource is released by the owner (Release) or taken over by the requester (Take Over, Special Take Over).
Tip
The best way to understand these procedures is to configure a global resource and do a test run with two operating desks.
Examples for a Resource Take Over
The following examples illustrate the different steps and status displays for assigning a return line.
The following settings in the configuration are used for the examples:
Resource Name | CODEC | |
|---|---|---|
Default Owner | (none) | |
Take Over Mode | Release | |
Subscriber Name | Stud1 | Stud2 |
Reserve for | Stud1 | Stud2 |
Key Color Available | Green | Green |
Key Color Owned | Red | Red |
Key Color Busy | Yellow | Yellow |
Situation 1: The resource is available and is taken over by Stud1.
| Stud1 | Stud2 | Switching Panel | |
|---|---|---|---|
| Status readout | Key CODEC = green | Key CODEC = green | Key CODEC = green, line 1 shows: CODEC |
| Request for resource | Key CODEC pressed + Key OK | - | - |
| Status readout | Key CODEC = yellow | Key CODEC = off | Key CODEC = yellow, line 3 shows: Rq Device Stud1 |
| Checking status of the resource | Key CODEC pressed | Key CODEC pressed | - |
| Status readout | Display (Rq = Request): CODEC Rq Stud1 | Display (Rq = Request): CODEC Rq Stud1 | - |
| Resource take over | Key CODEC pressed + Key OK | - | - |
| Status readout | Key CODEC = red | Key CODEC = off | Key CODEC = red, line 2 shows: Ow Device Stud1 |
| Checking status of the resource | Key CODEC pressed | Key CODEC pressed | - |
| Status readout | Display (Ow = Owner): CODEC Ow Stud1 | Display (Ow = Owner): CODEC Ow Stud1 | - |
Situation 2: The resource is owned by Stud1 and released by Stud1.
| Stud1 | Stud2 | Switching Panel | |
|---|---|---|---|
| Status readout | Key CODEC = red | Key CODEC = off | Key CODEC = red, line 2 shows: Ow Device Stud1 |
| Checking status of the resource | Key CODEC pressed | Key CODEC pressed | - |
| Status readout | Display (Ow = Owner): CODEC Ow Stud1 | Display (Ow = Owner): CODEC Ow Stud1 | - |
| Initialise release | Key CODEC pressed + Key OK | - | - |
| Status readout | Key CODEC = yellow | Key CODEC = off | Key CODEC = red, line 3 shows: off |
| Checking status of the resource | Key CODEC pressed | Key CODEC pressed | - |
| Status readout | Display (Rq = Request): CODEC Rq Off | Display (Rq = Request): CODEC Rq Off | - |
| Carry out release | Key CODEC pressed + Key OK | - | - |
| Status readout | Key CODEC = green | Key CODEC = green | Key CODEC = green |
Situation 3: The resource is owned by Stud1 and requested by Stud2.
| Stud1 | Stud2 | Switching Panel | |
|---|---|---|---|
| Status readout | Key CODEC = red | Key CODEC = off | Key CODEC = red, line 1 shows: CODEC, line 2 shows: Ow Device Stud1 |
| Checking status of the resource | Key CODEC pressed | Key CODEC pressed | - |
| Status readout | Display (Ow = Owner): CODEC Ow Stud1 | Display (Ow = Owner): CODEC Ow Stud1 | - |
| Request for resource | - | Key CODEC pressed + Key OK | - |
| Status readout | Key CODEC = yellow | Key CODEC = yellow | Key CODEC = yellow, line 3 shows: Rq Device Stud2 |
| Checking status of the resource | Key CODEC pressed | Key CODEC pressed | - |
| Status readout | Display (Rq = Request): CODEC Rq Stud2 | Display (Rq = Request): CODEC Ow Stud1 | - |
| Take over resource | Key CODEC pressed + Key OK | - | - |
| Status readout | Key CODEC = green | Key CODEC = red | Key CODEC = green, line 2 shows: Ow Device Stud2 |
| Checking status of the resource | Key CODEC pressed | Key CODEC pressed | - |
| Status readout | Display (Ow = Owner): CODEC Ow Stud2 | Display (Ow = Owner): CODEC Ow Stud2 | - |
Finally, you have to link the logic conditions of the resource with audio signals in an output function. (See Output Functions)
To do this, create the output functions in the device that physically owns the signal CODEC1. This signal must also be made available to the second device at the same time, for example via APC Link. The second device sends the return signal CODEC2 to the first device that is connected with CODEC1.
After that, the output function connected with the physical output to CODEC1 looks like this:
| Condition | Source 1 | Level 1 | Source 2 | Level 2 |
|---|---|---|---|---|
| Default | CF CODEC1 (local) | Off | CF CODEC2 (APC Link) | Off |
| CODEC1.Stud1 | CF CODEC1 (local) | 0 dB | CF CODEC2 (APC Link) | Off |
| CODEC1.Stud2 | CF CODEC1 (local) | Off | CF CODEC2 (APC Link) | 0 dB |