Administration Menu
Data & Devices
First of all you need to connect the DHD Operation Server (DHDOS) with one or more devices. This step has to be done each time you want to add a new device. In the Administration Menu, select Data & Devices to open the Devices window.

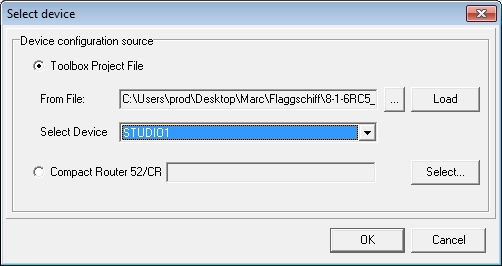
Add a new device by clicking Add device. The Select device window opens. To update a single Device, e.g. when you made changes in the TB8 Configuration of the Device, select it and click Update device….
If there is already an existing project and the dedicated server is only restarted, the connection to the device does not need to be established again. In this case, the information about the connection are stored in the server project file.
To load the configuration of the system out of a file, you can do that by using the option Toolbox Project File to choose a file from a drive (From File). Select your TB8 Project File by clicking on  and click
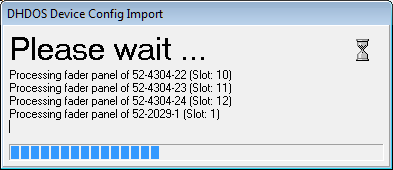
 Load. Is there more than one device available in the project file, you have to choose the desired device (Select Device). When clicking OK, the Device config is being imported.
Note
Choose the TB8 Project file you used to configure your system. The file will not be overwritten or touched.
By selecting a TB8 project file, the software automatically searches the network for DHD devices with the corresponding Project ID of the project file and connects to the chosen device.
Click Remove to delete the selected device from the list.
Note
The function Assign Serial Number.. has been used for assigning Serial Numbers to 52/CR and 52/MB Systems. This was necessary, becaus those devices had no Project ID as an Identifier. As the products are discontinued, the function is no longer available in newer DHDOS versions.
Project Options
Identification
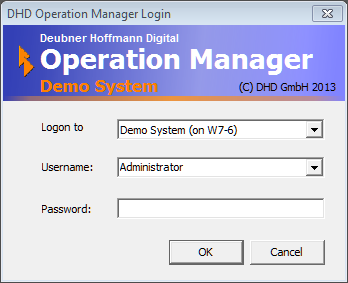
The character string in the Server Description box identifies a DHDOS project. This identification is shown within the DHD Operation Manager (DHDOM) logon.
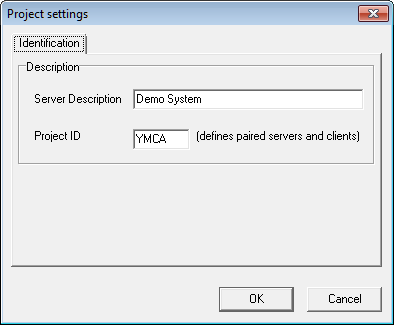
The Server Description is an arbitrary character string and can contain all characters in the range A-Z, a-z and 0-9. The number of characters is limited to 32. If you have not entered a string in the text box, the software will automatically use the project ID as server description.
The project ID is imported from the Toolbox5 project and should not be changed.
Server Preferences
General Tab
If the Quit server without confirmation check box is selected, the safety message is blocked which opens when the server is closed. The software application will be closed immediately.
Select the Run Server in DemoMode check box, if you want to operate the DHDOS in demo mode.
Select the Allow several servers on this computer check box, to be able to open several DHDOS entities at the same time on the same PC.
Note
When running multiple DHDOS entities on one PC, make sure you do not have fixed IP mode active. DHDOM finds DHDOS instances via TCP/IP broadcasts. Under certain circumstances, multiple DHDOS instances on one network card may not be found in network. We suggest using multiple network cards and/or separated Networks/VLANS instead.
Logging Tab
You can assign basic settings for the operation of the DHD Operation Server (DHDOS) in the Server Preferences window. In the Administration menu, select Server Preferences, to open this configuration window. On the Logging tab, you can make settings concerning the logging of commands.
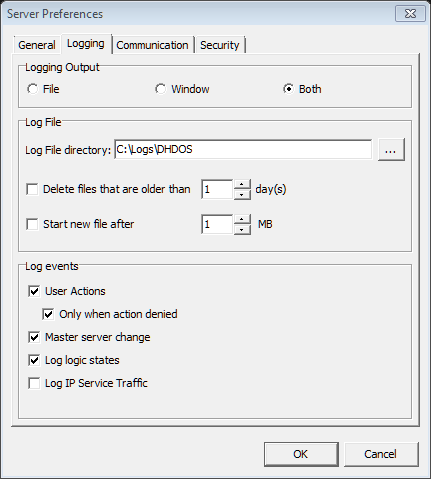
Logging Output
Select in the Logging Output area, where the logging data should be saved. Select File to log only in a file. Select Window to show the information only in the logging part of the DHDOS. Select Both to save the data to a file and show the logging data on the screen.
Log File
In the Log File directory box, enter the path, where the logging data should be saved. The directory in which you had extracted the program file DHDCS.exe is preselected here.
Log files include the logging data as text in ASCII format. The files are named by the pattern OSyyyy-mm-dd-xyz.log (e.g., OS2007-04-27-001.log). yyyy stands for the year, mm for the month and dd for the day, when the log file was started. xyz gets incremented if the option Start new file after x MB is selected. The option Delete files that are older than x day(s) gives you the possibility, that files with a certain age are deleted automatically. This option is deactivated by default. Values between 1 and 100 can be entered.
Important
When choosing the directory for the logging files, make sure, that your Windows user account has write access for this directory!
Select the Start new file after x MB check box, to limit the size of the log files. This check box is clear by default. All data is written in one single file. Depending on the data traffic, the file can become quite big after a while. You can avoid this by activating this option to adapt the file size to your expectations. So, the logging data are divided into several files.
Log events
All options in the Log events area are deactivated by default. Select User Actions to log activities of connected clients. If you want to log only user actions, which are not allowed to use by the respective user, you have to select the Only when action denied check box too.
Select the Master Server Change check box, to log the messages, which are generated if the current DHDOS master drops out and a redundant entity of the DHDOS takes over the control.
Select the Log logic states check box, to record logical state changes.
The Log IP Service Traffic Option enables Logging of traffic with external devices.
Note
If you have configured External Devices, they will be shown as Device Type External IP Device in DHDOS, Devices Tab.
Important
The Log IP Service Traffic Logging option works only, if the Option Log whole Traffic in DHDOS is also set for the External Device in DHDOM.
Communication Tab
The ethernet interface of your PC, that is used by the DHDOS to communicate with the DHD network, can be specified on the Communication tab. It is recommended to select the network card manually. In automatic mode is not guaranteed, that the DHD Operation Server communicates with the right network. If the message No Network Adapters Available is shown or the desired network adapter is not in the list, please check that the network card is installed correctly.
Security Tab
On the security tab, you can define, if changes concerning the server settings can only be done after entering a password. So, it is possible to protect the current settings.
This security gate can be activated after a defined time (Lock administration automatically after x minutes). Additionally, this gate can be activated by minimizing the application window (when hiding the server window).
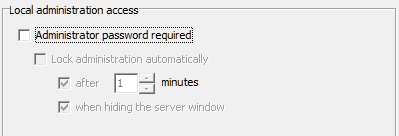
All options of the Security tab are deactivated by default.
By activating the security check, a new entry (Lock Administration) is added to the Administration menu. The entry appears dimmed as long as the administrator is not logged in. If he is logged in, it is possible to log out by clicking this command.
Important
Make sure you know your Administrator Password! If this option is activated, the password can not be resetted.
To setup User Accounts and Passwords, see DHDOM/Administration/User Accounts