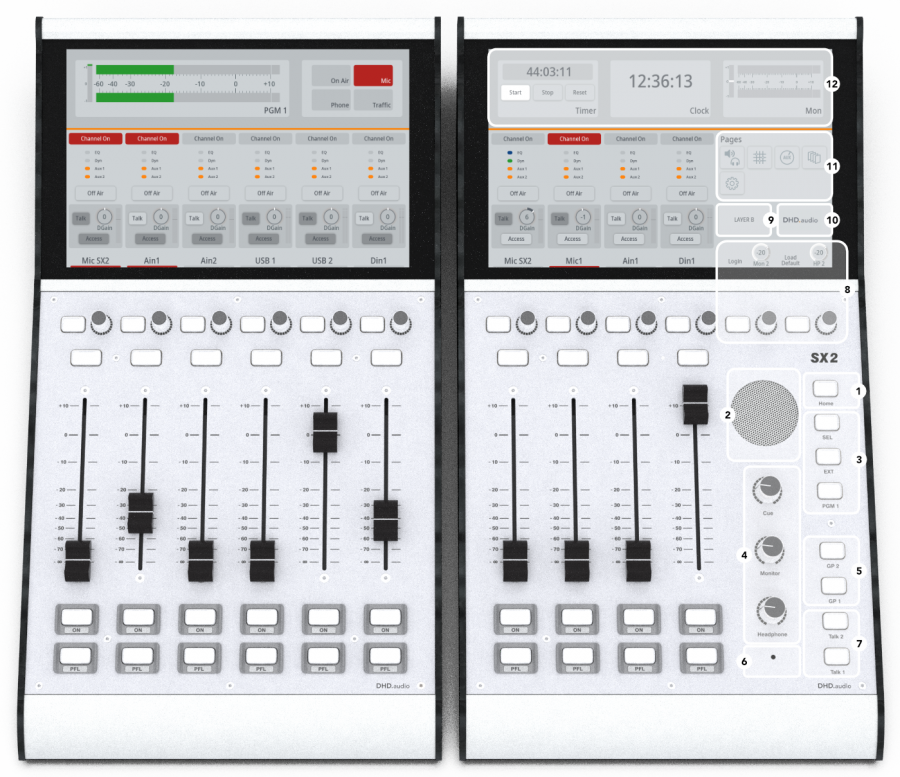
Central module
The central module 52-5614 is the main control module of an SX2 mixing console. The central module also includes a 10“ TFT display that is separated into various functional areas. The 52-5614 central module also contains 4 fader. For more information on faders area, see Fader Modules.
In the following, you can find features and pre-configured push button functions of the 52-5614 central module.
(1) Home-Button
Is used to wake up the console surface and to return to the default views.
(2) Pre-listening and talkback speaker with built-in amplifier
No additional audio cable is required for this central module. The audio signals will be transported together with control signals and electrical power through one CAT5 cable, which is connected to an APC port on the XC2 / XS2 Core.
(3) Monitor selector, expanded by touch-display selector
See SX2 Configuration - Console / Monitoring Keys. Sel key source can be changed using Monitor Selector ![]() page.
page.
(4) Professional high-grade volume potentiometers.
Used to set Headphone, Monitor, and CUE Speaker level.
(5) GP - General Purpose keys
You can use these keys to switch GPOs and get status signalization from a GPI, or any other available logic source. See SX2 Configuration - Console.
(6) Talkback microphone with built-in preamp
No additional audio cable is required for this central module. The audio signals will be transported together with control signals and electrical power through one CAT5 cable, which is connected to an APC port on the XC2 / XS2 Core.
(7) Talkback keys
It is possible to configure these keys for a simple talkback, for example to a sound booth or an additional SX2 mixing console. See SX2 Configuration - Console.
(8) Operation section
Use the Login key to login. The Load Default key loads the default snapshot. Hold down key for 3 seconds.
The two encoders can be used to control additional audio levels. The function of the right encoder is variable and can be changed using the monitoring page (set level section) on the central module (see below).
(9) Layer B key
This key toggles all faders to Layer B if available.
Note
Key is only visible if configured in SX2 Configuration - System settings. Also, you have to assign channels to Layer B. See SX2 Configuration - Channel Assignment
(10) Logo area
You can replace this image with your own logo. (see SX2 Configuration - System settings).
(11) Page selector
You can choose, which page the overbridge multifunction area shows. When Access is pressed, this page selector changes. Available Pages are:
Default Pages
Monitor Selector
Choose monitor sources. To change the monitor source:
- Select the desired monitor bus on the left (Mon 1 - 4)
- Select the source you want to monitor in the
Sourceslist in the center
Choose, which monitor level is controlled by encoder 2 in area 8 via the Set Level section. To change the encoder function, tap the desired bus. Available buses are:
- Mon 2 Spk
- Mon 2 HP (default selection)
- Mon 3
- Mon 4
Note
Assignment is reset to default when the console is restarted or console entered access mode.
Audio Routing
Route different sources to the designated outputs. Also, you can choose, which source is routed to the monitor (Mon) peak meter.
Aux Master
Mixer Snapshots
Settings
Access to Brightness options, Color Scheme, Signal Switch, PFL options, and a system status page (Show Status button).
Access Mode
Input
Select the Input source for the fader, set analog and digital gain, set 48 volt phantom power on (P48V button) (if available), change the channel label, set panorama/balance.
EQ
Set subsonic on/off and subsonic frequency. Set EQ on and reset EQ. Set EQ filter band 1-3 gain, q-factor, frequency and characteristic (notch, bell, hi/lo shelving). To access EQ settings, double tap EQ filter curve.
Aux
Snapshot
Comp
Limiter
Clean Feed
Automix & Delay
Optional, 52-8581 enhanced DSP processing license required
set Automix for this channel on, set auto mix weight, set auto mix into passive mode and set delay time, delay on / off and reset delay.
(12) Overbridge multifunction area
This area shows the default view that is set in SX2 Configuration - Console. If a page in the page selector area (11) is selected or access mode is active, the view here will change to the selected page.


