Project Menu
New
A new project file is created and its Project ID is generated by a random generator. The project is empty and contains no devices.
This command can also be executed by clicking ![]() in the toolbar.
in the toolbar.
If a project file is already open, it can be saved before creating the new file.
Note
Only one project file can be shown at the same time. It is possible to open the Toolbox software several times on a PC to be able to edit several projects at the same time.
Open
An already existing project file is opened.
You can execute this command also by clicking ![]() in the toolbar or by pressing
in the toolbar or by pressing Ctrl+O.
If a project file is open already, it can be saved before opening the new file.
Note
If you open a project that was saved with an older version of Toolbox, a backup file is automatically created. The file is named Backup_TB8Version_8-x-x_<original file name>.ddp and is located in the same folder like the original project file.
Save
The current project is saved.
The command can also be executed by clicking ![]() in the toolbar or by pressing
in the toolbar or by pressing Ctrl+S on the keyboard.
Save as
The current project file is saved with a different name. The program suggests the current name in the Save dialog box. The new project file is available for further configuration directly after saving, the original file is closed.
Compared to the function Save Copy of Project File as you are automatically working with the new created file after saving.
Save Copy of Project File as
The current project file is saved under a different name. The program suggests the current name in the Save dialog box.
Compared to the function Save Project as, after saving you are still working with the original file and the new created file is only saved.
Tip
Use this command to save intermediate states of a project file as backup.
History
Using the History function in the File menu of SXConfig and DXConfig, you can log modifications of the configuration. This way, you can later reproduce, which user made which modifications of the system at which time.
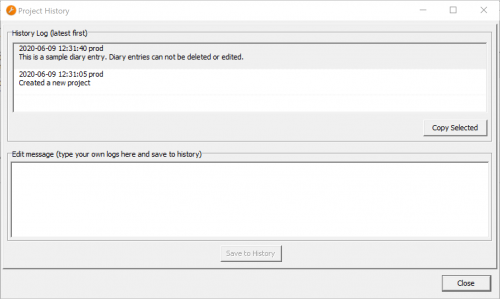
In the File menu click History; the Project History window opens. On the Project Message History tab, in the History Log area, the single entries are shown with date and time, as well as the login name of the user (Microsoft Windows Login) who created the entry. SXConfig itself logs some processes, for example when and by who a configuration was originally created. Other changes that seem important to you can be inserted manually.
To do this, select the New Message tab, type the new message and click Save to log the text in the history. Click Clear to delete the whole text that is entered in the Enter Message box.
To show a message, on the Project Message History tab, select an entry in the History Log list. The text is then shown in the Message box.
Note
A history entry can not be changed or deleted, once the entry was saved.
Import
In this section import options of Toolbox Software are explained.
Replace Device from File
It is possible to save the configuration of each device separately in a file. (See Export Device to File) Using the command Replace Device from File the user can select a device file (extension .dx8) and overwrite a device in the project with its contents.
This function is only available if a device is selected in the project tree. Otherwise, it is inactive.
Warning
The configuration of a device that is already available in the project is overwritten by this command and can not be restored. Therefore, the program opens a confirmation message before you can select a device file. If you confirm the file selection in the Open dialog box, the configuration currently available in the device is completely overwritten! Therefore, if in doubt, previously save the old configuration of the device using the command Export Device to File.
Using this command, you can transfer an already existing device configuration from one project to another. To do so, follow these steps:
- Save the device configuration that is already available in the appropriate project. There, select the desired device from the project tree and save the configuration to a file using the
Export Device to Filecommand. - In the new project, create an empty device. To do this, click
Addunder the project tree. - Select the new device and click
Replace Device from File. Select the file you created in the first step. Now you have copied the configuration of a device from the existing into a new project.
Important
When copying device configurations, pay attention to global functions that may be defined already. The available values for global logics and global potentiometers may be overwritten with the information from the device file (depending on the actual configuration).
Add TFT config from File
It is possible to transfer the configured TFT views from one mixing device to another, even if the devices are located in different Toolbox projects. (See Export TFT config to File) With the command Add TFT config from File the user can select a TFT config file (extension .dtx) and add the saved views to the TFT views of the device selected in the project tree. Already existing TFT views are not overwritten.
This function is only available if a device is selected in the project tree. Otherwise, the option is inactive.
Using this command, single or several TFT views can be transferred at the same time from one device to another. To do this, follow these steps:
- Save the already existing TFT views of the corresponding device. To do this, select the desired device in the project tree and save its TFT view configuration using the command
Export TFT config to File. - Select the device you want to transfer the TFT views to and select the command
Add TFT config from File. Select the file you created in the first step. You have now copied the TFT views from one device to another.
Important
After copying the TFT views, remember the links between display elements and buttons with functions. To use the TFT views correctly, the functions of the display elements have to be configured for the new device.
Example: You have loaded a TFT view that shows filter settings on a channel. At least one EQ must be configured as DSP function on this channel.
Important
Make sure to define export IDs for matching colors so you don't exceed Toolbox limitations. See Colors - Export ID.
Export
In this section export options of Toolbox are explained.
Export Device to File
This command saves the configuration of a device as file with the extension .dx9. Any name can be chosen for the file.
This function is only available if a device is selected in the project tree. Otherwise, it is inactive.
Export TFT config to File
This command saves the TFT views of a device as a file with the extension .dv9. You can choose any file name.
This function is only available if a device is selected in the project tree. Otherwise, this option is inactive.
Export AudioIDs/LogicIDs
This command saves the audio and logic IDs of a device as file with the extension .dpx. Any name can be chosen for the file.
The content of this file is useful if you want third party devices to communicate with the DHD system by an external protocol. Because the audio and logic IDs are assigned dynamically in Toolbox, it is necessary to take a look at this list. Therefore, open the file with a text editor.
Important
Make sure to define export IDs for matching colors so you don't exceed Toolbox limitations. See Colors - Export ID.
Last Used Files
Shows you the last five files used with your user account.
Using this command, different printouts can be arranged.
You can also execute this command by clicking in the toolbar.
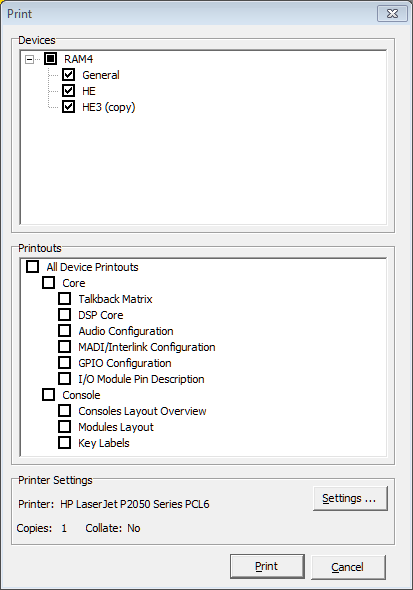
In the Print dialog, you can choose in the Devices area which device in the project the printout is intended for. Select the project root (indicated by the project name) to include all devices or select just single devices.
In the Printouts area you can select, which parts of the documentation of the selected devices are to be printed.
The option All Printouts includes the complete documentation of the selected devices. Alternatively, you can also print all printouts of the DSP frames and/or all printouts of the console view as well as single parts of the documentation. You can select the following print sections:
Frame View: View of the DSP frame with selected board configuration.Audio Configuration: List of audio configurations with corresponding labels, slot- and port numbers and further options. To keep the list compact, no MADI modules are included.MADI Configuration: List of MADI configurations with corresponding labels, slot- and port numbers and further options. To keep the list compact, only MADI modules are included.GPIO Configuration: List of GPIO configurations with corresponding labels, slot- and port numbers.I/O Cards Pin Description: Pin assignment of all ports of the configured audio boards (analog and digital) are printed.Console Layout Overview: View of the complete mixer interface on one or more pages, depending on the number of used racks.Modules Layout: View of all operating modules contained in the configuration, each shown on one page.Key Labels: Printout of all key labels available in the configuration on one or more pages. For printing, presentation transparencies and an appropriate printer should be used. The printed labels can be cut out and inserted in the key caps.
Exit
This command quits the Toolbox software. A message prompting you to save an open project file is shown if its current state is not saved yet.