Mixer Snapshots
Double click the entry Mixer Snapshots (this is a child entry of the Snapshot Manager) in the list on the left-hand side of the DHDOM window to open the Mixer Snapshots tab.
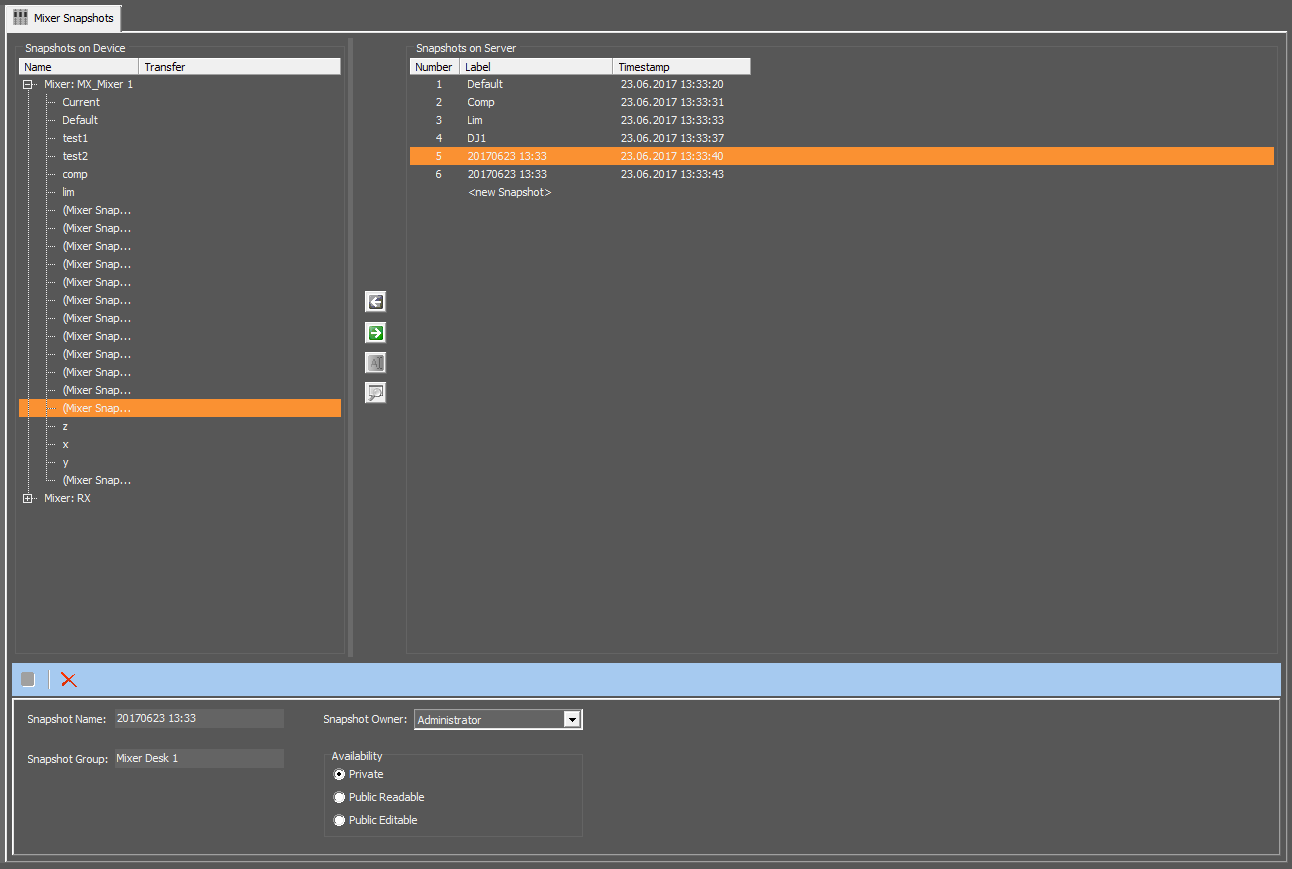
On the one hand you have mixer snapshots stored in the devices (shown in the list Snapshots On Device) and on the other hand, you have snapshots saved on the server PC (listed in the field Snapshots On Server). By using drag'n'drop or the arrow buttons between the lists you can copy mixer snapshots from the device to the server and vice versa.
Please understand the snapshots on the device and the server as named containers for snapshot parameters. Since only the parameters of these containers are exchanged, the names are not overwritten by transferring a mixer snapshot from the device to the server or vice versa.
Besides the 20 free configurable mixer snapshots, you can find the mixer snapshot 0 (Default) and the current state of the mixer (Current) in the list on the left side of the window. The server side shows all saved snapshots and the entry <new Snapshot>.
Note
If not all conditions are met, it is not possible to transfer a snapshot. Please see the table in the section Snapshot Transfer Conditions if you are not able to transfer snapshots.
Note
The Default Mixer Snapshot (Snapshot 0) can only be transferred from a device to the server but not vice versa. Only administrators are able to overwrite the Default snapshots in the devices.
Another possibility is to use the maintenance window of the Toolbox8 software to transfer the Default snapshot to the device.
Furthermore, you can copy the saved mixer snapshots from the server database to another folder, drive or PC.
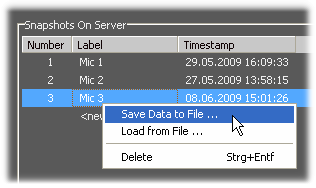
Right-click a snapshot in the right-handed list to open the contextual menu. Choose the command Save Data to File to save a copy of the snapshot in a file. Use the entry Load from File to load a saved snapshot. Delete removes the snapshot or use the shortcut Ctrl + Del. Another possibility to delete the currently selected snapshot on the server is to click the  symbol. The date in the
 Timestamp column shows the time the snapshot was created or when the snapshot content was overwritten last.
If you have selected a snapshot on the server, the snapshot editing section is shown at the bottom of the window. Herein, the snapshot can be defined as Private, Public Visible or Public Writeable. Public Visible means, the snapshot can be seen and loaded by everyone. Select Public Writeable to give all users the possibility to overwrite the snapshot and to change the settings provided in this section. If the Private option is activated, other users can not use the snapshot in any way. Users with administrative rights can always see and edit all snapshots.
The owner of the snapshot is shown in the field Snapshot Owner. Administrators and the owner of the snapshot are able to assign a new snapshot owner.
To be allowed to transfer a mixer snapshot from the server to a device, the Snapshot Group ID must be identical. Therefore, enter the group ID of the mixer you want to transfer the mixer snapshot to in the text box Snapshot Group.
For organization purposes, the snapshots on the server can be renamed in the field Snapshot Name.
After you have changed the settings, the  symbol is active and you can save your settings by clicking the symbol.
The labels of the snapshots 1 to 20 in the list Snapshots On Device can be changed. The labels of the Current and the Default snapshots are not changeable. Click the  symbol between the lists. Alternatively, you can right-click the snapshot in the Snapshots On Device list and select
 Rename Snapshot. The Rename Device Snapshot window appears. Enter the new snapshot name and press enter. Repeat this procedure for all snapshot names you want to change and click  afterward to transmit the changes to the device.
It is possible to read out the saved parameters of snapshots on the device and on the server. Click the  symbol between the lists to open the
 Snapshot Content window.

