Selectors
On the Selectors tab, you can configure the selectors of the device. You can select, which audio signal is used as a default source. After switching on the device or after a reset, the selectors point to the sources selected here. These are also enabled if no monitoring key was defined. If you press an enabled monitoring key again, the assigned source is disabled and the default source is used again.
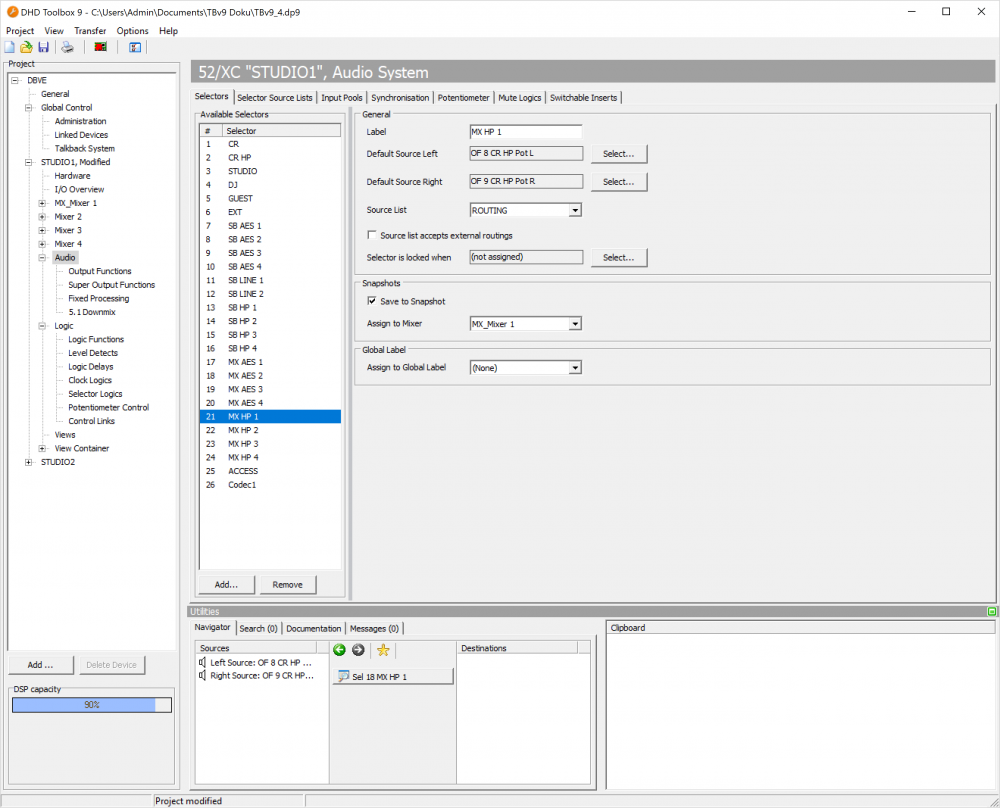
In the Available Selectors list, you can see all created selectors. Click Add to create a new selector. You can create up to 300 selectors.
Note
300 selectors are supported for 52/XC2, 52/XD2, 52XS2 cores only.
52/XC, 52XD, and 52/XS support only up to 200 selectors.
Note
Toolbox v9.1.0 & FW 9.1.0 or higher: With the introduction of Hardware Selectors a maximum of two Selectors can be directly cascaded after another.
If the direct cascade of Selectors is or should be longer, some of the involved Selectors need to be “buffered” via Output Functions, Super Output Functions or Fixed Processings in order to meet the mentioned maximum. Otherwise this specific audio path will be muted.
To delete a selector, select the desired selector in the Available Selectors list and click Remove.
Please read in the Output Functions and I/O Overview sections how to link selectors and outputs.
In the areas on the right hand side, you can change options for the selected selector.
General
| option | description |
|---|---|
| Label | • After creating a selector, it has no name and is shown with the used functions as follows: (Sel <#>). Enter a distinctive name in the Label box to make the identification of the different selectors easier during configuration. |
| Default Source Left | • Select the left default source that is used if no monitoring key is defined. To do this, click Select, the Audio Sources window opens. Select an audio source from that window and click Assign. Alternatively, you can double-click on the audio source or drag the desired audio source on the Default Source Left box. |
| Default Source Right | • Select the right default source that is used if no monitoring key is defined. To do this, click Select , the Audio Sources window opens. Select an audio source from that window and click Assign. Alternatively, you can double-click on the audio source or drag the desired audio source on the Default Source Right box. |
| Source List | • You can assign a list of audio sources to each selector. Up to 20 different lists with a total of up to 500 entries are available here. The sources for the signal lists can be assigned under <Device>/Audio, on the Selector Source Lists tab. (See also Selector Source Lists) • You can assign the 20 signal lists to the Monitor Selectors and the Output Selectors of the clean feed system as you like. |
| Source list accepts external routings | • If selected, e.g. an external routing software can change sources of the assigned source list, that are not previously defined in the source list. |
| Selector is locked when | • You can select a logic source to lock the selector to prevent changes. To do this, click Select, the Logic Sources window opens. •. Select an logic source from that window and click Assign. Alternatively, you can double-click on the logic source or drag the desired logic source on the Selector is locked when box. |
Snapshots
| option | description |
|---|---|
| Save to Snapshot | • Select this check box if the settings of the selector should be saved in mixer snapshots. • Please note the options Assign to Mixer and Selectors. |
| Assign to Mixer | • You can assign the selectors to virtual mixers. This way it is possible to prevent that loading a mixer snapshot on a virtual mixer overwrites the settings of selectors that are used by another virtual mixer. |
Global Label
| option | description |
|---|---|
| Assign to Global Label | • You can assign a Global Label to the selector. The selected Global Label will now have the value of the current active source of this selector. |