Virtual Keys
Virtual keys act like real keys, but they are not available on the console. You can use all central key functions with any trigger logic. Of course, the trigger logic could be a key of the console, but also any other available logic of the system. For example, external keys connected to a GPI, fader start logics, the power source logic or a synchronisation logic.
To create and configure virtual keys, select <Device>/<Mixer>/Virtual Keys.
In the Virtual Keys list, you can see all created virtual keys. Click Add to create a new virtual key. You can create up to 100 virtual keys (number depends on the device type). To delete a virtual key, select the desired virtual key in the Virtual Keys list and click Remove.
In the Key Options area, you can assign a central key function by clicking the Function button. Depending on the selected key function, more options will be shown in this area. Please find detailed information on the key functions in the Console section.
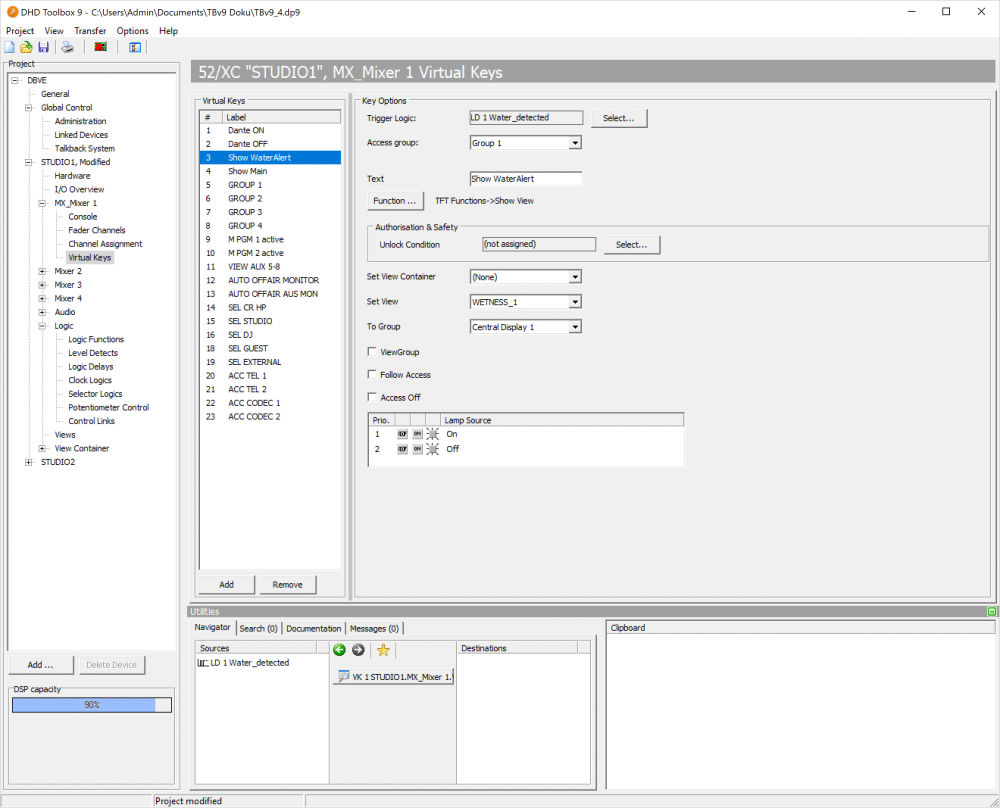
Usually, the key functions are assigned to a physical key or a TFT button. In case of the virtual keys you have to select a trigger logic that replaces the manually pressed key. In the Key Options area, click Select… to choose a logic source. The Logic Sources window opens. Select a logic source from that window and click Assign. Alternatively, you can double-click on the desired logic source or drag it from the Logic Sources window to the Trigger Logic box. If you want to use logics from other DHD devices of the same project, you need to select the Show All Devices check box in the Logic Sources window.
Access Group: Select here to which access group the virtual key belongs. All keys and modules of an access group cooperate for certain functions, for example when setting parameters for a fader channel on the central console.
In the Text box you can enter a distinctive name for the virtual key.
Special case: Toggling a virtual key triggered by another toggling key
If you have assigned a toggling key function to a virtual key and you want to use a toggling key as trigger logic, the virtual key only reacts on the activation of toggling trigger key. That means, by pushing the trigger key, of course this key toggles (function is active) and the virtual key toggles, too. With the next keypress, the function of the trigger key is deactivated, but the function of the virtual key remains active. If you activate the trigger logic again, the function of the virtual key is deactivated.
There is a simple solution to adapt the behaviour of the virtual key, so that the states of the toggling virtual key are identical to the states of the toggling trigger key:
- Create a logic function with two sources. Both sources are the same trigger key, but one source reacts on “Pulse on activate” and the other one reacts on “Pulse on deactivate”. The sources need to be “OR” linked. (For more information on creating logic functions please see the section Logic System.)
- Use this logic function as trigger logic for the virtual key.
Example
The following example shows a talkback panel of another manufacturer or a custom-made product that is connected to a DHD device via GPIOs. Due to the virtual keys it is possible to integrate the external elements into the DHD system and to assign the desired behaviour.
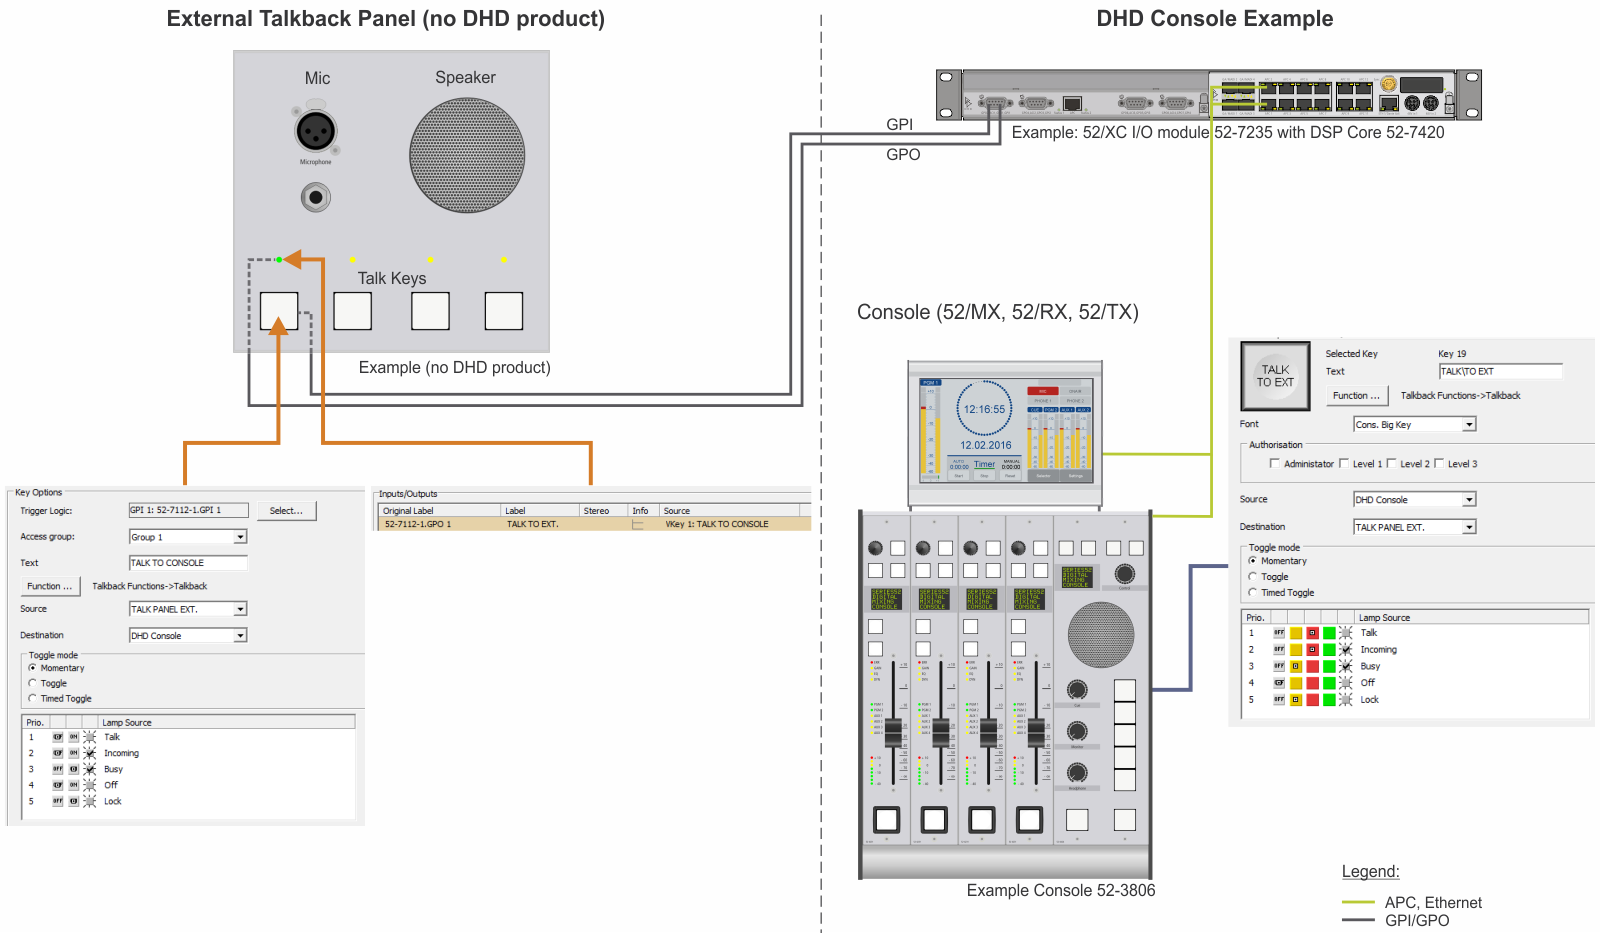
On the right-hand side of the example picture above you can see a DHD console (this could be a 52/MX console 52/XC Core operated with Toolbox). To one of the console keys the Talkback key function is assigned. The talkback panel on the left-hand side is a third party device or a custom-made panel. Maybe this panel has simple pushbuttons (momentary-contact switches) and LEDs for the state indication. The desired talkback pushbutton is connected to a GPI of the DHD console and a GPO of the console is connected to an indicator of the talkback panel. In Toolbox a virtual key needs to be created. As trigger logic of this virtual key the GPI (connected to the external pushbutton) is used. Furthermore, the virtual key must be assigned to the GPO that drives the external indicator.