Receive and edit incoming RX streams
Simple Mode
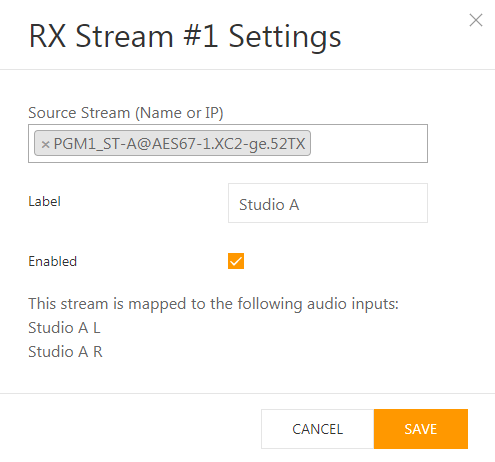
In Simple configuration mode, stereo RX streams can be configured quick and easy. Audio sinks and default source streams can be predefined with Toolbox software.
Label
The Label field is only for management and information purpose to handle streams internally. You can assign any name to an RX stream.
Note
The maximum length of a stream label is 16 characters
Source Stream (Name or IP)
Specify a valid source stream in the Source field. You can enter a Name or an IP
Enabled
When a Stream is enabled, the interface will start receiving it. If no network or configuration issues exist, the stream will be received correctly.
Check to enable the stream after clicking Save. If the stream is already enabled, the checkbox will be checked when opening the dialog. Uncheck and click Save to disable the stream.
Enable/Disable-Operation can also be done without the dialog window using the slider element in the Enable column in the RX-/TX Streams table on the Streams Page.
Cancel / Save
The buttons Cancel and Save on the bottom of the settings dialog window
Save: Save and apply changes directly. Stream audio may be interrupted when applying changes.Cancel: Cancel and discard changes. All changes will be lost.
Advanced Mode
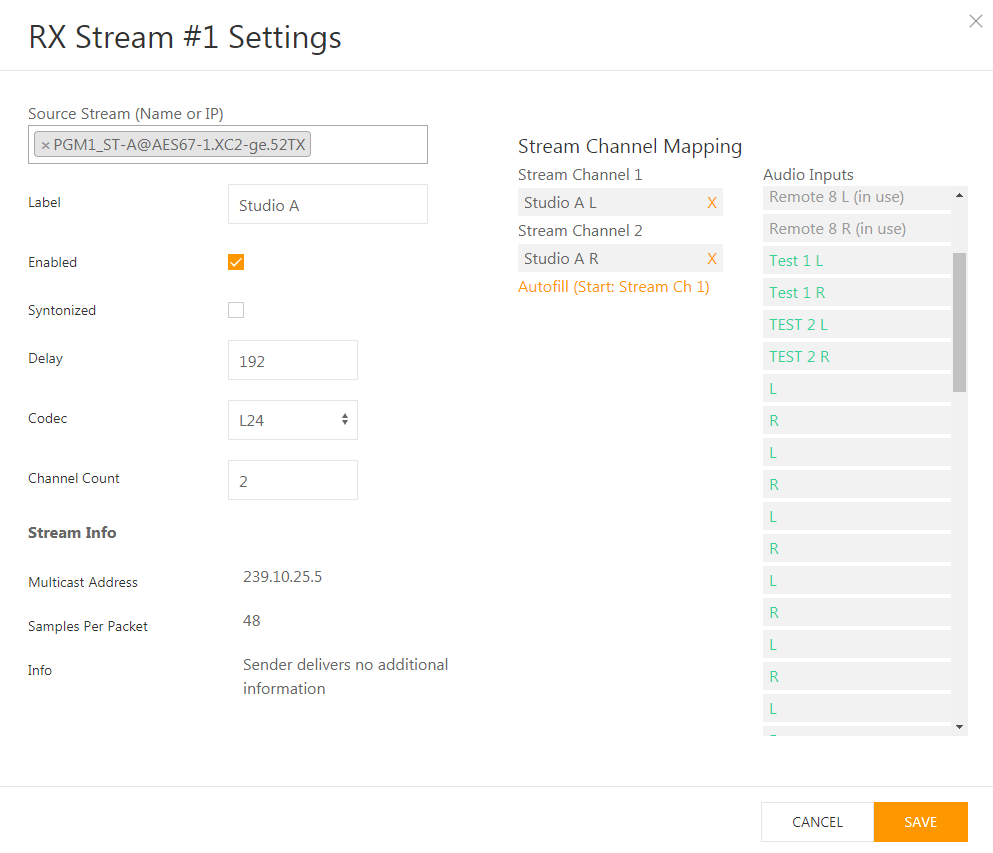
Source
Specify a valid source stream in the Source field. You can enter a Name or an IP
Label
The Label field is only for management and information purpose to handle streams internally. You can assign any name to an RX stream.
Note
The maximum length of a stream label is 16 characters
Enabled
When a Stream is enabled, the Interface will start receiving it. If no network or configuration issues exist, the stream will be received correctly.
Check to enable the stream after clicking Save. If the stream is already enabled, the checkbox will be checked when opening the dialog. Uncheck and click Save to disable the stream.
Enable/Disable-Operation can also be done without the dialog window using the slider element in the Enable column in the RX-/TX Streams table on the Streams Page.
Syntonized
Syntonized option decides how received packets are sorted and played out / sent as audio out.
Syntonizeddisabled (checkbox not selected) (default value): received samples will be played out sorted in order of the RTP timestamp matching to the Media Clock. They will be sorted within the buffer. If the buffer is too small or doesn't contain the next required time-continuous audio packet, it will result in dropouts. This can also happen due to packet loss. The next available time-continuous packet will be used. Playout will take place based on the PTP synchronization of the sample counter.
Syntonizedenabled (checkbox checked): received samples will be played out in chronological order of the receive time, RTP timestamp is ignored. The phase relationship of audio signals received within this stream will be fix. The phase relationship compared to audio signals received with other streams is not fix, because the playout time differs. Using this mode can avoid audio dropouts, or overcome playout issues if a stream sender is not synced to the same PTP time.
Codec
RAVENNA AES67 interface supports the following codecs as RTP payload formats, in which audio is digitalized and formatted. The Codec value sets itself automatically based on the session description of the discovered stream. See encoding for more information.
Possible Values are:
- L16
- L24 - Default
- AM824
Delay
Delay to buffer incoming streams bevor handing them to the audio destination. In case of audio dropouts or other unwanted behavior, first, try to choose a higher buffer value.
If the stream was discovered by the AES67 RAVENNA Interface and the session description contained information about the streams framesize, a value of 4-times the framesize will be suggested automatically. For AES67 compliant streams, it's 192.
| Dimension | audio samples |
|---|---|
| Min value | 1 |
| Max value | 11904 (absolute max) or max 62 * Samples per Packet |
| Default value | 192 (AES67 Default) |
The actual maximum is calculated as 62 * Samples per Packet. Samples per Packet depend on the selected RX stream. This is due to hardware limitations.
Max Delay Times
All milisecond values are calculated with L24 audio data and a samplerate of 48kHz.
| Packet Time (ms) | L24 audio channels per stream | Frame size* | max delay (ms) |
| 4 | 2 | 192 | 248 |
| 2 | 4 | 96 | 124 |
| 1.333 | 6 | 64 | 82.666 |
| 1 | 8 | 48 | 62 |
| 1 | 10 | 48 | 62 |
| 0.5 | 16 | 24 | 31 |
| 0.25 | 32 | 12 | 15.5 |
| 0.125 | 64 | 6 | 7.75 |
Maximum delay calculation: 62 buffer * packet time (ms).
*The frame size defines the number of audio samples per channel per network packet.
Note
We have prepared an excel table with packet time calculation based on different frame sizes. You can download it here.
Channel Count & Stream Channel Mapping
Select in the Channel Count field, how many mono channels the stream shall receive. The value will be filled automatically with the right amount, when a discovered stream is selected on the Source Stream (Name or IP) field.
When changing the Channel Count value, the Stream Channel Mapping area on the right-hand side also changes, depending on the number of mono channels set.
In the Stream Channel Mapping area two columns exist:
- The left column contains the audio sources of the stream (
Stream Channel #). The number changes depending on the value set inChannel Count. - The right column contains the available
Audio Inputson the TDM bus. The available inputs can be set up via Toolbox configuration software (See Configuration via Toolbox).
This allows to route received audio from streams to TDM bus destinations.
To assign an Audio Input to a Stream Channel, simply drag the source from the Audio Inputs column to any audio source field. This way, you can also replace already assigned sources by drag & drop of a new source. To remove assigned sources to empty values, click the X button on the right of the gray source field.
You can also perform a autofill operation for rows of sources in an ascending order:
- Assign the beginning source to the
Stream Channel 1field by drag & drop. - Click
Autofill (Start: Stream Ch 1). TheStream Channel 2and all following fields will be filled in ascending order with sources from theAudio Inputslist.
Cancel / Save
The buttons Cancel and Save on the bottom of the settings dialog window
Save: Save and apply changes directly. Stream audio may be interrupted when applying changes.Cancel: Cancel and discard changes. All changes will be lost.

