Device properties
If you select the top nodes in the project tree of a device, you can see the tabs Options, Virtual Mixers, Virtual Mixer Snapshots, Mixer Snapshot Channel Mapping and Channel Snapshot Types. Here, you can set up the features and the snapshot options of the selected device.
Options
The Options tab contains general information and settings of the device.
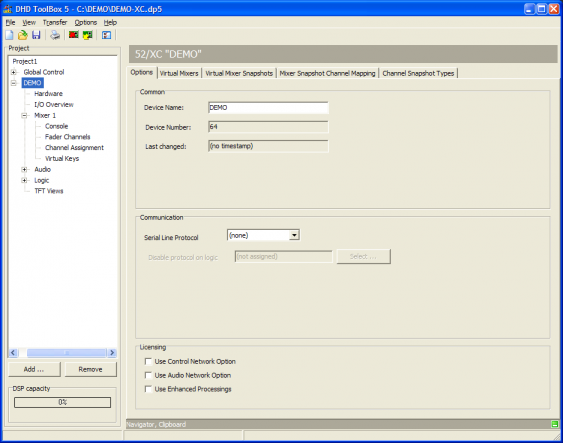
You can set up the following options:
| area | option | description |
|---|---|---|
| Common | Device Name | This is the name of the device which can be changed if necessary. If a project contains more than one device, you should use different names for them. This makes configuration easier, because the device names are used in different lists. The device name can also be shown in the display of the different modules. |
| Device Number | This number is unique within one project. It identifies the device in the project and it can not be changed. | |
| Last changed | Here are the date and time of the last change of the device configuration shown. If no timestamp is shown here, the Config has not yet been transferred to a device. (See also Transfer Menu) | |
| DSP Frame Type (only 52/RM4200D and 52/XR devices) | Select the desired frame type. Either RM420-061 (3 HE), RM420-062 (6HE), RM420-063 (6HE) or RM420-064 (9HE) to build up a DSP frame or 52-6063 (3 HE), 52-6066 (6HE) for a router frame. By selecting the frame, the number of available slots for the configuration of I/O modules is defined. | |
| Console Type (only 52/RM4200D devices) | Select whether you want to configure a 52/MX device or an RM4200D device. This selection can not be changed as soon as modules are integrated in the console. | |
| Communication | Communication Controller | Choose the Communication Controller which you have installed in the device. 52/RM4200D DSP Frame: RM420-852 or RM420-853 52/XR Router: 52-6850 (select the 52-6850, even if you have installed a 52-6851) |
| Set Controller A/B Master logic (only 52/XR devices) | Here you can assign a logic which forces the controller A or B to be the master controller for this device. | |
| Serial Line Protocol | In this list, you can select an external control protocol (Probel SWP-02, ESAM II), to control the DHD system with an external device via the serial interface. Note The licence 52-8571 Pro-Bel Protocol SW-P-02 or 52-8572 ESAM-II control protocol is needed to be able to use the desired control protocol. |
|
| Disable protocol on Logic | Assumed the ESAM II protocol is selected, a logic can be defined that deactivates the support of the ESAM II protocol. | |
| Licensing | Use Control Network Option | To enable the features of the XC/XS Core Control Networking licence select this check box. Important The configuration can only be loaded into the device, if the corresponding licence key is assigned to this device. |
| Use Audio Network Option | To enable the features of the XC/XS Core Audio Network licence select this check box. Important The configuration can only be loaded into the device, if the corresponding licence key is assigned to this device. |
|
| Use Enhanced processings | To enable the features of the Enhanced DSP Processing licence select this check box. Important The configuration can only be loaded into the device, if the corresponding licence key is assigned to this device. |
Virtual Mixers
In Toolbox5, you can configure up to 4 parts of a split console as independent units (only 52/RM4200D with RM420-852B controller, 52/XR and 52XC Core 52-7400). To do this, select the corresponding device in the project tree and select the Virtual Mixers tab.
In the Mixers area, you can see a list with all your available virtual mixers in this device. In a new project, there is a default device named Mixer. Click Add to add another virtual mixer to this list. A maximum of four Virtual Mixers can be configured in one device.
Click Remove to delete a selected virtual mixer from the list. The sequence of list entries and the serial numbers can not be changed.
In the Mixer Name box, you can change the Label of the selected mixer.
In the Talkback Member drop-down menu, you can assign the selected mixer to a talkback member of the talkback matrix. You should create these talkback members previously in the Talkback Member Matrix, otherwise there is no talkback member available. (See also Talkback Member Matrix)
To enable the Talkback Member drop-down menu in an 52/XC device, the XC/XS Core Control Networking licence has to be assigned to the DSP core and the corresponding Use Control Network Option check box has to be selected on the Options tab (see also Device Properties - Options).
Note
If you remove all Virtual Mixers from the list, the device consists only of one DSP frame and has no longer a console. This way, you can use this device as a router.
Virtual Mixer Snapshots
It is possible to save the settings of your console in so called Virtual Mixer Snapshots. Please find the saving options at <Mixer name>/Snapshot Options. (See Mixer/Snapshot Options)
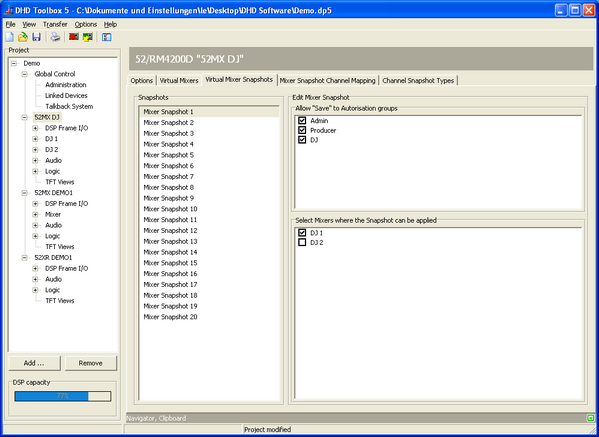
You can save up to 20 Virtual Mixer Snapshots. These 20 snapshots are listed in the snapshots area of the Virtual Mixer Snapshots tab.
Select a Mixer Snapshot from the list to define its options in the Edit Mixer Snapshot area. In the Allow “Save” to Authorisation groups list, you see all defined authorisation groups (see Authorisation - Authorisation Groups). Select the check boxes to allow these users to save a specific mixer snapshot.
In the Select Mixers where the Snapshot can be applied list, you have to assign on which virtual mixers it is allowed to use the selected snapshot.
Mixer Snapshot Channel Mapping
You can save a mixer snapshot on a virtual mixer and load it on an other virtual mixer. If you want to do that, it is necessary to define which fader channels of the virtual mixers belong to which channels of the mixer snapshot. You needn't to take care about the channel mapping if you only want to use mixer snapshots on the same virtual mixer where they were saved, because this mapping is done automatically.
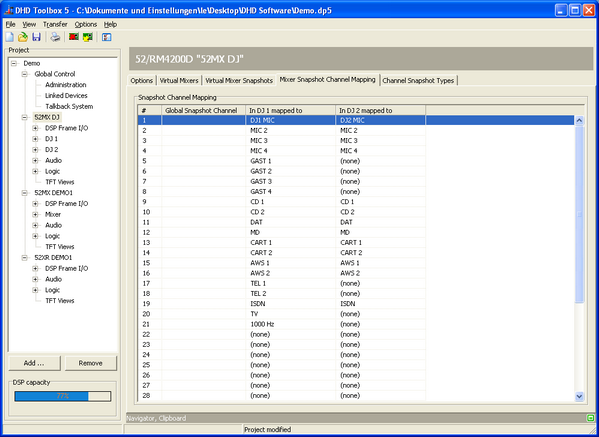
The left column of the Snapshot Channel Mapping table shows a consecutively numbering. These numbers are important for the internal process and can not be changed.
In the Global Snapshot Channel column it is possible to enter a name for every snapshot channel. This name is not used anywhere else.
The following one, two, three or four columns (depending on the number of created virtual mixers) contain the fader channels of the virtual mixers. To change the assignment of the fader channels select a cell of the snapshot channel you want to edit. Afterwards, click this cell again, the cell changes into a drop-down menu and you can select an other available fader channel.
If you want to assign an already assigned fader channel to a snapshot channel, you first have to release it. That works like the procedure mentioned above, but do not select an other fader channel - select (none). Now the fader channel is not assigned and can be assigned to an other snapshot channel.
Example:
There are two virtual mixers. One is named DJ 1 and the other one is named DJ 2 (see the picture above). In the virtual mixer DJ 1 a fader channel DJ1 MIC exists. This fader channel is assigned to snapshot channel 1. In the virtual mixer DJ 2 a fader channel DJ2 MIC exists. This fader channel is assigned to snapshot channel 1, too.
That means, if you now save a mixer snapshot on DJ 1 and load it on DJ 2, the settings saved for the fader channel DJ1 MIC of the virtual mixer DJ 1 are applied for the fader channel DJ2 MIC of the virtual mixer DJ 2.
Channel Snapshot Types - Assigning snapshot types to snapshots
Here, you can assign the channel snapshot types you had created at Global Control/Channel Snapshot Types (see Channel Snapshot Types - Creating Snapshot Types) to channel snapshots.
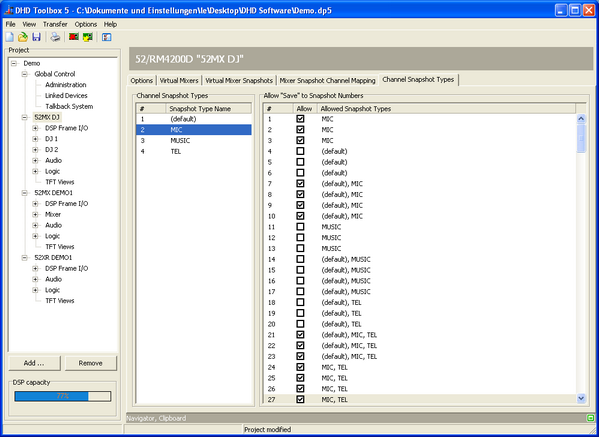
In the Channel Snapshot Types list, all created channel snapshot types are shown.
All 250 available channel snapshots are shown in the Allow “Save” to Snapshot Numbers list. Each snapshot is identified by a consecutively numbering.
To assign a channel snapshot type to a channel snapshot or to undo an assignment, select a type in the Channel Snapshot Types list and select the check box in the row of the snapshot channel you want to edit in the Allow “Save” to Snapshot Numbers list. Which channel snapshot types are assigned to the channel snapshots is shown in the Allowed Snapshot Types column.